
Tone Down Highlights
Sometimes the only thing that keeps a good portrait from being a great portrait is a little too much shine on the skin. Here’s a quick and easy way to tone down those highlights.

Step 1
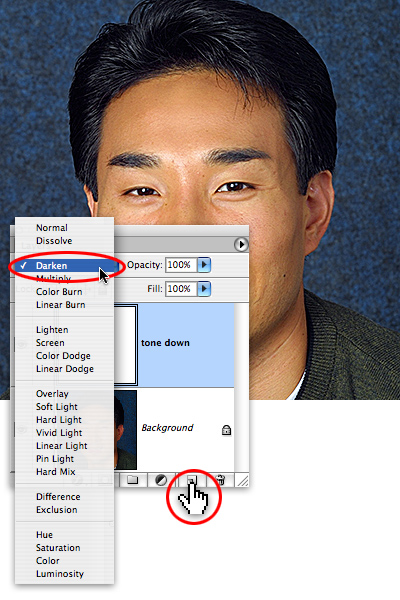
Open the image, and add a new layer by tapping on the Add layer icon at the bottom of the Layers palette. Name the layer “tone down”, and set the layer’s Blending mode to Darken.
Step 2
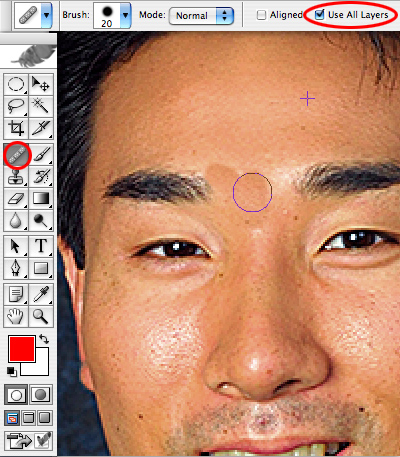
Next, select the Healing Brush tool (Photoshop CS2 users, make certain it’s the Healing brush and not the Spot Healing tool). Set the tool to Use All Layers, and then sample by holding down the option/alt key and tapping on a non-glare skin area. Let go of the option/alt key, and paint over the glare area. Since the corrections are on their own layer, you can easily correct any mistakes by erasing or layer masking.
Step 3
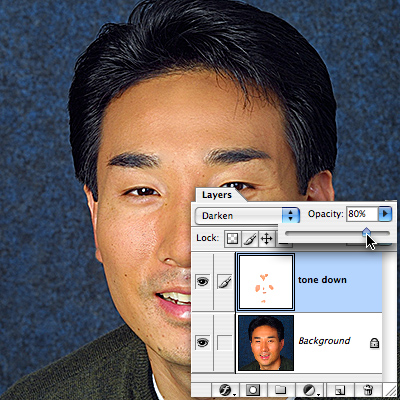
Pull the opacity of the tone down layer by sliding the opacity arrow to the left until the glare areas look perfect. Congratulations– now even if your subjects get nervous in front of the camera, you can still make them look cool as a cucumber with Photoshop.

Wwwheeeeeeeewww….!!! you saved my life. I’m not a Photoshop expert, and this is EXACTLY what I needed. Thank you so much.
Thank you for this tutorial. I’m new to photoshop so this really helped me.
Thanks for this tutorial, you make it very explanatory to help newbies like me to understand it. Thanks again!!
Great tutorial, helped me with a problem I’ve been having for a long time!
nice tutorial, thank you a lot!
Este turorial e muito bom.
muito obrigado.
beijos!!!!!!!!!!!!!!!!
Thanks a lot. This artical helped me to retouch my wedding pics so that i can upload them to facebook
Oh! its MIRACLE!!!
Wow TONE DOWN is a SIMPLE & EASY way to remove Highlights.
Thanks