
The Shadowy Face of The Luminosity Mask
Last week we learned how to use a Luminosity Mask (Command+Option+Tilde [~] or PC: Control+Alt+~) to emphasize highlight details in ultra bright situations such as snow on a Swiss Alp.
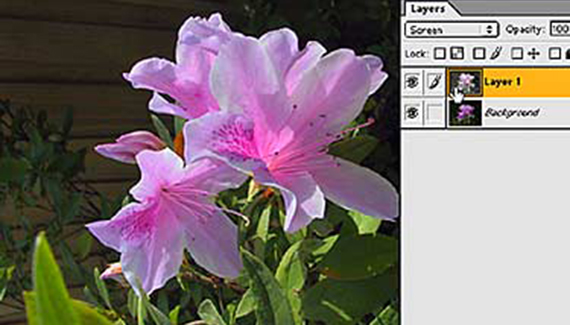
But the LuMask is more than a one-trick pony. The more you use it, the more ways you’ll think of to use it. For this week’s demo photo, we move from the Jungfrau to my back yard (which is a lot like the Jungfrau, my neighbors say). The shot is of azaleas blooming with my neighbor’s unsightly fence in the background.
While the image is basically well exposed, it could stand some beefing up in the highlights and I’d dearly love to make the fence go away. LuMask to the rescue.

First, I’ll make a LuMask by using the Tilde sequence mentioned above. I’ve made this into an Action so F4 does the job without getting carpal elbow. As you can see, the selection looks just like any other marching ants pick.

I send the mask selection to its own layer (Command+J/Control+J). For demo purposes, I’ve isolated the mask layer and run an extreme Levels so it shows up in the screen shot. In reality, it’s quite faint and looks mostly gray.
To beef up the highlights, I set the LuMask layer’s blending mode to multiply. It seemed a bit too beefed up so I decreased the layer opacity to 77 percent. I cut a chunk out of the mask layer for demo purposes in the screen shot above.

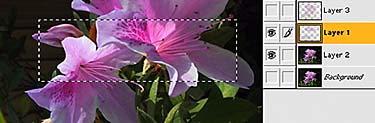
After flattening the image, I created another LuMask but this time Inversed it (Command+Shift+I/Control+Alt+I). The screen shot above shows how it selected the green leaves and shadowed fence in the background.
Now, here’s the other face of the Luminosity Mask. If I set the Mask layer to the Screen blending mode (instead of Multiply), the detail in the shadows pops out. In this case, you can now see the unpainted grain of the fence which does nothing at all to help the picture. Still, if you need shadow detail, LuMask plus Screen is the way to go.

So to improve the image, I set the Shadow LuMask to Multiply which made the fence vanish and darkened the leaves. What’s more, I ran a Command+J on that layer to make a second mask, then lowered its opacity to about 50% to get an azalea that looks as if it were shot with studio lights.
I hope you find the Luminosity Mask technique as useful as it is to me. BTW… you’ll find the Tilde key on the far left of the keyboard’s numbers row.

How do you do the luminosity mask in Photoshop CS3 on an Intel Mac?