Sponsored by the National Association of Photoshop Professionals. Learn More
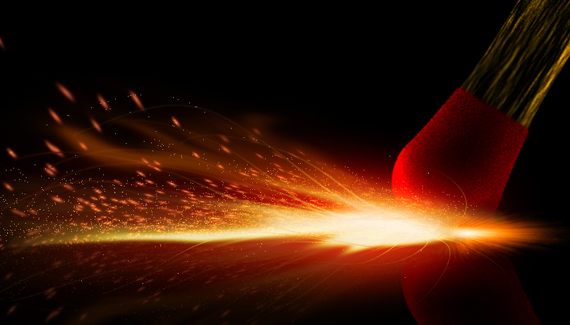
In this two part tutorial we are going to illustrate a close-up of a match strike from scratch in Photoshop.
RSS feed for comments on this post. TrackBack URI
Corey has a cool trick for creating a flare brush and see how one effect can lead to another.
See how you can add some subtle touches to give that green screen studio shot the Hollywood treatment.
Corey shows how to create reflective holiday ornaments using 3D in Photoshop.
This week Corey has a cool new trick for using 3D reflections in a rather creative way!
If you have a multilayer composition and you
want to apply an effect to all the layers at once, don’t flatten the layers–use a composite layer instead. Hide the layers you want excluded, and press Shift-Command-Option-E (PC: Shift-Ctrl-Alt-E). A new layer will be created at the top containing a merged copy of all the visible layers.
Another option is to create a new layer at the top of the stack and make it active. Command-click (PC: Ctrl-click) each layer you want to include to make those layers active, as well. Press Option-Command-E (PC: Alt-Ctrl-E).
by Colin Smith
Vojtik said on — September 23, 2009 @ 5:04 pm
First comment!!!
Hey Corey this is a really great tutorial….looking forward to Part 2….can´t wait
Luke said on — September 23, 2009 @ 5:07 pm
Love it, thanks:) first comment woot
Celeste said on — September 23, 2009 @ 7:48 pm
Like it!! Creative use of warp tool…looking for part 2!
Phillip said on — September 23, 2009 @ 9:37 pm
Great Tutorial, Love It! Thank You
Corey Barker – Match Tutorial « The Photo Nomads Pingback on — September 24, 2009 @ 7:04 pm
[...] really good video tutorial here by Corey Barker over on Planet Photoshop. You can’t beat Corey’s [...]
Dustin said on — September 25, 2009 @ 2:48 pm
this is a cool tutorial,
Riki said on — September 29, 2009 @ 7:55 am
Fantastic! thank you very much for the tut.
Behnam said on — October 2, 2009 @ 6:26 pm
Love your work
Tnx for the tutorials and keep it up
debbi said on — October 11, 2009 @ 4:15 pm
This is great!
Debbi
David said on — October 18, 2009 @ 9:26 am
Great job once again, keep up the work
TheIVA said on — April 15, 2010 @ 4:18 pm
Mega cool!
Peter said on — April 16, 2010 @ 4:48 pm
Hello:D From Sweden…I want to see your tutorials in HD…Best regards
Theresa said on — April 20, 2010 @ 1:40 pm
What a great tutorial, as usual! Thanks and can’t wait for part two! I already know how I want to use this!
Lisa said on — April 20, 2010 @ 1:51 pm
that’s sooo brilliant! =O
rowyn said on — April 20, 2010 @ 1:55 pm
wow..amazing..hope to see more and learn from you more.
Meagen said on — April 20, 2010 @ 2:13 pm
I wish I had your knowledge on photoshop. I think it’s absolutely amazing what you do. I only use basic things with my photography. You have opened a new world for me. I can’t wait to learn more and be able to do magic.
Wadi3 said on — April 20, 2010 @ 2:56 pm
Hi, Nice one.. But I need to know how you copied the effect style with using mouse only can you explain more?
Scott Valentine said on — April 20, 2010 @ 3:15 pm
Nicely done, Corey!
AceOfThumbs said on — April 21, 2010 @ 1:37 am
Thanks for the great tutorial! And you always throw in lots of creative tips and time-saving shortcuts! Easily my favorite PS guru!
Mina said on — April 21, 2010 @ 9:57 am
Awesome! Thanks man.
Aarón Alexis said on — April 21, 2010 @ 11:27 am
Excelente tutorial, y gracias por enseñar otra forma de hacer el efecto de fuego
Phil said on — April 21, 2010 @ 11:58 am
It’s cool and helpful, thanks a lot.
sarika said on — April 21, 2010 @ 10:17 pm
cool!!!
Luz Elena said on — May 7, 2010 @ 4:20 am
Hello, from spain, thank you, exellent tutorials. i do not speak english but still learn a lot.
djillo said on — June 27, 2010 @ 8:39 am
I am a teacher myself and there are very good among photoshop users. this is more than a good work. excellent corey. thanks for sharing.