
“Step-and-repeat” is the term used for the process of duplicating an object and spacing. Typically step and repeat is used in an object-oriented program, such as InDesign, rather than in a pixel-based editor, such as Photoshop. However, you can indeed replicate a step-and-repeat technique in Photoshop.
Let’s work with the example of creating a series of evenly spaced pawprints. I added a new empty layer to the image, then used the Custom Shape tool to create a couple of paw prints. (Remember that the Custom shape tool’s behavior is governed in the Options bar with three buttons. Select the first button to create shape layers, the middle button to create work paths, the third – the one we need for this example – to add pixels to the active layer.)
Hold down the Option/Alt key and press the keyboard shortcut for Edit> Free Transform, Command-T (Mac) or Control-T (Windows). Adding the Option/Alt key to the shortcut enables to make and transform a copy of the pixels rather than transforming the original. This will give us the next pair of pawprints. With the transform bounding box active, click on the layer content and drag to duplicate and reposition. Press the Return/Enter key when done.
Now here’s where it gets easy! The keyboard shortcut for Edit> Transform Again (which repeats the previous transformation, Move in this case) is Shift-Command-T (Mac) or Shift-Control-T (Windows). Again, if we add the Option/Alt key to the combination, we duplicate and transform rather than repeating the transformation on the previously-transformed content. Pressing Option-Shift-Command-T (Mac) or Alt-Shift-Control-T (Windows) three times gives us a series of pawprints.
Afterward, you can manipulate any individual copy of the object by selecting that layer in the Layers palette. And you can, of course, select all of your object layers and merge them into a single layer with the shortcut Command-E (Mac) or Control-E (Windows). (In versions of Photoshop prior to CS2, link your layers and use the Layers palette menu command Merge Linked.)
NOTE: If you don’t want to create separate layers for each copy, make a selection of the original objects before performing the first transformation. You can Command-click (Mac) or Control-click (Windows) on the layer thumbnail in the Layers palette to select the content of the layer.
Okay, so that’s all well and good, but how often do you need pawprints? You can also use “step and repeat” to, for example, create a dozen marks around a central point, evenly spaced, to represent the face of a clock:
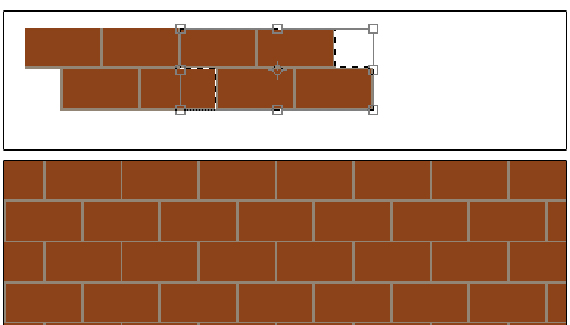
Or perhaps you need to create a brick wall:
Just about any time you need to create a series of identical elements distributed evenly, you can use this step and repeat technique. The three keys to the technique:
–Remember to work on a separate layer.
–Use the Option/Alt key when creating the first transformation.
–Use Option/Alt with the Transform Again shortcut to create the additional replicated objects.

Thanks! This is exactly what I needed (and wished I had known before :P)
please send me how can used face cleaning tools
thanks
thank q for you suggestion
this very nice
Thank you. This is a great timesaver. Freehand, despite all its other faults, had a step-and-repeat that was very helpful. Indesign has a very nice set of controls for step-and-repeat that would be nice to see in Photoshop.
alt + t does not work with CS6