
Selecting fly-away hair can be one of the toughest assignments in Photoshop. The Extract command can be helpful. Third-party plug-ins, such as Mask Pro (www.extensis.com) and KnockOut (www.corel.com), are great. But sometimes the easiest way to select those random strands of hair is right in your Channels palette.
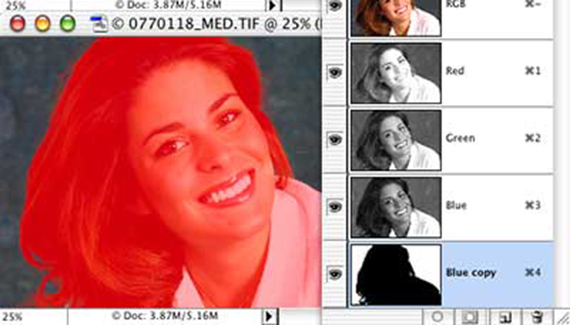
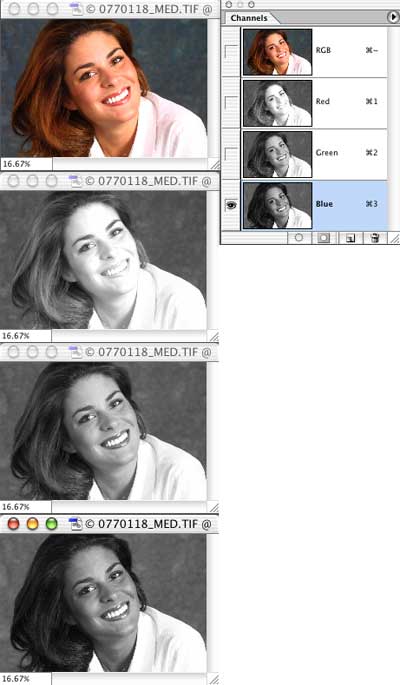
Open the image in Photoshop. Open the Channels palette. Click on each channel, one at a time, to find the channel with the greatest contrast between the strands of hair and the background behind them. (Ignore the rest of the image, you’re only interested in the area around the individual strands of hair.) In our sample image (PhotoSpin.com, #0770118), the Blue channel offers the best contrast.
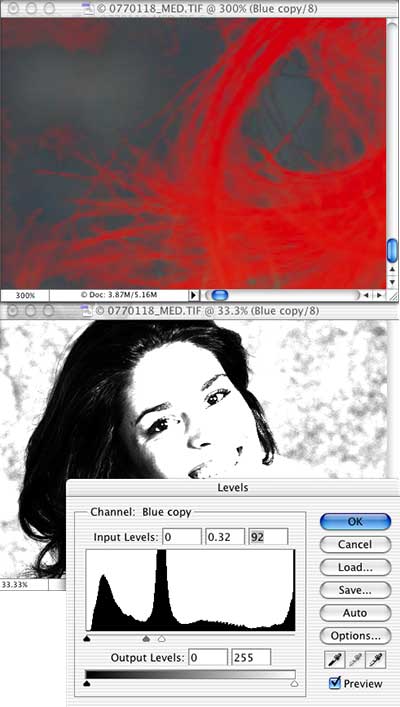
We’ll duplicate that channel by dragging it to the New Channel button at the bottom of the Channels palette. With the Blue copy channel active in the Channels palette, we can use Levels or Curves to maximize the contrast. Again, we’re interested only in the fringe strands of hair. (Note that I’ve used the command Window> Arrange> New Window for [image name] to open a second window for the image, in which I’ve zoomed to monitor a specific area of the image.)
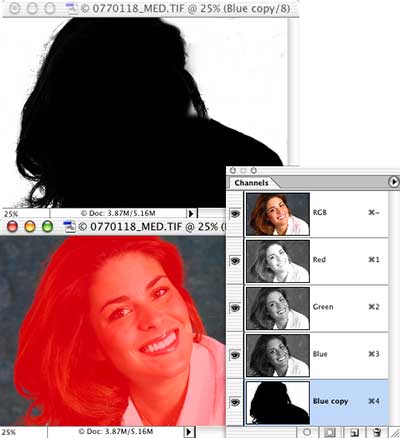
Using the Lasso tool and the Fill command, in combination with the Brush tool and the Eraser tool, we can easily fill in the subject and delete the remaining areas of the background. (In the upper window, only the Blue copy channel is active and visible. In the lower window, only the Blue copy channel is active, but all channels are visible.)
When the mask is complete, click on the composite channel at the top of the Channels palette to make it active, then Command-click (Mac) or Control-click (Windows) on the mask channel (Blue copy, in this example) to load the channel as a selection. You can delete the background, fill it with color, or invert the selection and copy the subject, ready to paste into another image.

What are the steps involoved in “using the Lasso tool and the Fill command, in combination with the Brush tool and the Eraser tool, to easily fill in the subject and delete the remaining areas of the background?”
Thanks,
Sarah
i appreciate this tutorial, thanks for that! But can you make it a video to make easier for me, thanks!
This tutorial is definitely really useful but I’ve tried this technique on a really curly-hair photo and the result is not that good… The problem is that a part of the white background is still remains in the hair. Any tips?
I agree with Sara. While I know how to use those tools in normal situations I’m having a hard time understanding exactly what we are doing here that I wouldn’t just normally do the “long” way with out using channels.
I have been looking for this for along time. I’ve seen other co-workers whip it out and get a nice hair selection many of times, but I had no time to look over shoulders. It was so simple. I always thought it was something very complex that they where doing or using a filter of some sort. THANKS DOOD!
NICE TOOTORIAL
What are the steps involoved in “using the Lasso tool and the Fill command, in combination with the Brush tool and the Eraser tool, to easily fill in the subject and delete the remaining areas of the background?â€
Thanks,
Sarah
Sarah – seems like you are not going to get your answer. I too want that answer. the problem with to many tutorials is the expect us to have the “common knowledege” to do what they ask us to do.
This was very helpful, thank you. :o)
Thanks for sharing…
Once you get it selected, go to Select>Refine Edge and play around with the conrtrols. This will give you almost unlimited control over the unwanted colors.
can you see why this tutorial works fine in here? they choose a picture with great contrast
and hair is not that complex, i could easily do this with eraser tool
this method is useless when the background has similar color to the subject you intent to subtract. also with very curly hair or flying hair won’t work.
This is what I have figured out in relation to – “using the Lasso tool and the Fill command, in combination with the Brush tool and the Eraser tool, to easily fill in the subject and delete the remaining areas of the background†–
You want the solid parts of the figure and the hair near the scalp to be filled in completely. I have found that using the pen tool to select the figure works well, then fill the selection in with the paintbrush or paint bucket. You don’t want to fill in any of the hair that may have white showing through it, or else it won’t look convincing when transferred to a different background. If you have filled in any part of the background, you will want to erase it.
This is what i want to get.
Crap tutorial!! you help with the channels then all of the sudden there is this red mask on which i dont have…. not helping at all on how to do the rest……
@Gavin
It shows you how to achieve the red mask in the final screenshot – select all channels including the newly created alpha channel (blue copy), this will show the original image with the mask overlaid.
Simples
I am confused. Was this article written years ago? I opened Adobe Bridge (I have CS3) and it clearly states that Adobe Bridge has been discontinued. So what gives?
This technique is good but not that great.. It works but the results are not satisfactory..
Awesome, thanks so much, especially great for animals and such
thanks
works a treat… when background is not of similar color as hair…
I like girls
Agree with Sarah and others; seems this tutorial assumes we know what “using the Lasso tool and the Fill command, in combination with the Brush tool and the Eraser tool, to easily fill in the subject and delete the remaining areas of the background,” means, which is crap. If I had that kind of knowledge in my “common knowledge,” I’d be long past trying to select tricky hair. Waste of my time; on to try to find somebody that explains their work.
You are going along alright and then say:
Using the Lasso tool and the Fill command, in combination with the Brush tool and the Eraser tool, we can easily fill in the subject and delete the remaining areas of the background. (In the upper window, only the Blue copy channel is active and visible. In the lower window, only the Blue copy channel is active, but all channels are visible.)
And wala, you are close to done… but we did not get shown how to do all of those things. so This Tutorial stinks!!