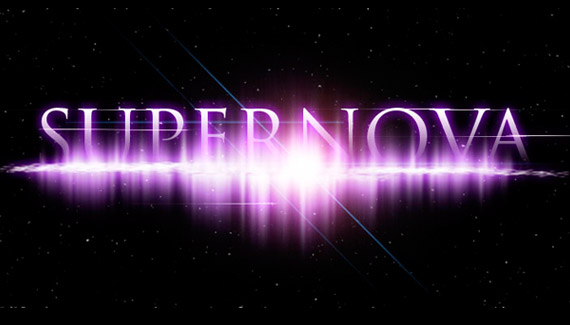
Corey stumbled upon this effect while experimenting with the smudge tool and its finger painting feature. Start off by going back to his starry background tutorial and follow along from there.

Corey stumbled upon this effect while experimenting with the smudge tool and its finger painting feature. Start off by going back to his starry background tutorial and follow along from there.

as always, brilliant use of the photoshop tools….thanks for sharing
Corey…your inquisitiveness and creativity is fabulous. Another winner 🙂
Very Nice Very Handy I Could Use That
Corey, you already know I think you rule. Very nice tut thanks alot.
You’ve given me some really usefull effects and uses of tools that have inspired me.
It’s really great seeing how you can bring several of your tutorials together.
I wouldn’t have been able to do half the stuff I can without these tutorials !
great show. I put the 1st smudge layer to Multiply and got a cool dark nebula effect.
Your my hero!
Nice work Corey,
That will help me with some work thanks for the demo,
Thanks Again
Damien
Corey,
I’ve been watching you grow since you joined the Photo Shop Guys. You are one cool cat with lots of neat tricks ‘n treats !
You never stop amazing me. Keep up all the great work here and on Layers, and everything else you do.
Corey… I have seen some tutorials in my time but that was probably one of the best.
A very cool finished product!
Awesome 🙂
I love you man.
Fantastic.
My wife makes fun of me for how often I tell her how cool you are. The way you apply ‘found’ techniques is really unbelievable sometimes.
Thanks for making me a better designer.
Love every tutorial and blog that you submit. Thank you, you have inspired me to become a better designer.
Fantastic
another frikin awesome tut!
Thank you very much
Studied very beautiful and wonderful
Just when I thought I knew photoshop…
Fun Stuff !!!
-Thanx
good work
Corey,you are great! when are you coming to England ?
Thank you again Corey for doing great work I learned lots from you man thank you so much again .
Regards
thank you, im probably using in a logo : )
Good stuff Corey you rock!
Very nice outcome, really brought out all the little things that can make great work.
Amazing!
I’m only a beginner at photoshop, but thanks to this, my work is already looking better!
Thanks for the great tutorial.
One quick question, can you change the colour of the MOVIE PRIME (Lens Flare)? Let’s say from this blue to a green?
Thanks
Hey good tutorial my name is Cory as well 😀
hey corey me again…..love the tutorials
http://i196.photobucket.com/albums/aa132/Moffeia/Untitled-1-1.jpg
Corey, if you wan’t to know what I feel about you and your tutorials… go read the other comments… Just kidding… You and your tutorials rock on and on and on… Well yuo both rock! In this one I learned a tip to copy the layer styles in a faster way, but with your tutorial I also seen some other ways of bringing together tools and creativity! And that deserves a “Phoscar”! The Photoshop kind of an Oscar prize… If there isn’t one, there should be! Eheheheh! Keep it up, I have you on my tabs at IE when it opens every single time, always waiting for new stuff… Just by any chance, can you start using a program that alows us, if you and PlanetPhotoshop don’t mind, to download the video? Or at least create a podcast either for Adobe Media Player or iTunes… I don’t know if there is one, but, there it goes the sugestion…
See you soon! (Unfortunately just virtually, becausde, besides of the money, Photoshop World is “a world away” from Portugal!)
Márcio Guerra
P.s.- Flogsta Karl, I didn’t tried the tutorial by myself, just seen it here, but, from what I seen, if the Lens Flare gives you one new layer, which it seemed, you can, 99% shure, change its color, either with Hue and Saturation and an Adjustment layer, and, in the Adjustment layers, really, any one that implicates color…
Thanks Marcio, will try it at home and report if 😉
Okay, adding a Adjustment Layer (Hue/Saturation) did kind of the job. But it changed more than I wanted to. But I have to say that I am a beginner and might have done something wrong. I appreciate your help.
I’d like to nominate Corey for the Photoshop Hall of Fame.
Seriously.
Any one second the motion?
Corey rocks!
Hi again…
Flogsta Karl, if you do a old thing, I don’t remember the exact name without opening Photoshop, but, I know the shortcut, and you place the cursor over the line in between the adjustment layer and the layer that it is adjustating (if that is a word!), and press Alt+G or Option+G in the Mac, with cursor over the line, ok? The cursor should turn in to something like two circles, one over another, and then you just apply the layer to the one being adjusted. Pretty easy. To know the exact name go to the menu bar, under layer, and see something with the shortcut that uses a G in it, and you should find it… The name, and the command, in case you are not too sure of what to do. If you go by the shortcut, remember, you need to be between those layers.
Hope it helped!
Márcio Guerra
I love the way you teach and this is a good one. Thanx so much.
Umm how’d you get the brushes, lol can some1 help .
Just saw the U-tube flames version. I agree with you to experiment. Try a brush the length of the document and do something similar to your steps. You can create rolls or sheets for a neat background – even rolled metal by applying gradient layer styles. I was even able to create a swirl of gooey chocolate or caramel by using one of my downloaded brushes. Holding down the shift key between “strokes” alaws you to zig-zag continue the effect.
Cool stuff!
Still a man. :]]
Nice teachingggg.
Nice mines wasnt as good but i got the idea ill prolly forget couple days from now but i love it
I tried it and it was 100% satisfactory. EXCELLENT step by step tutorial. Keep adding more.
I am only learning Photoshop and I am 68, but computer literate. This looks awesome to me and I can’t thank you enough for sharing it with us. I have one problem, which, although may be humourous to some, actually isn’t(!)…..I am very, very hard of hearing through something called Menieres Disease(!)….not catching..LOL….so I can’t hear any instructions! Is there a text version?? I know the obvious answer is ‘no’ but, hey a guy has to try!
Wow that’s really cool. Thnx Corey 4 sharing. U saved me with this text effect cause i needed a new idea 4 my college project. U R the #1.
Superb, It’s mind blowing! 10 of 10.
Great. If you judge this tut like… Results/Time its about five stars.
Fast And Furious
For some reason when I use the gradient tool on the texting mask, nothing happens. Can anyone help?
awesome.. thank you very much for sharing..
Corey, you are awesome thank you for sharing this tutorials, this helps a lot.
Love this tutorial. i’ve even got to use it in a film i made on the school. big success!
You’ve given me some really useful effects and uses of tools that have inspired me.
THANK FOR U
AMJAD G.
i want to download..how??
Great i love this site…you guys are great!! Keep up the good work and thanks for sharing 🙂
this is a great effect thnx
Hey i cant find the tutorial that is suppose to come before this one, the starry background tutorial?? A little help please?
hey thanks a lot this really helped me with the presentation part of my science project. cheers!
Brilliant!
Thanks corey I stubled upon your tutorials today cant stop watching them
Hats of to you Corey
Thanks a lot
thanks for the great post love your video very cool text look
Same problem as chris….when i use the gradient tool nothing happens. Doesn’t show the change in the layer window either. Yes i added a layer mask. Please help!!!!!
Your tutorials are very helpful and I love the new ideas you come up with. You’re always on top. Thanks
This is realy good and easy love ir thank you so much i like all of the videos
your the BEST.
Thank you so much , GOD of Photoshop !
Where is the brush panel? I am new to using photoshop and I can not figure out some of the more simple steps. How do you open it like you did to select the brush type?
Great tutorial, thank you
Great job Cory!! I believe this type of smudge will work great for a water splash effect.
Thanks a million Corey. Honestly, you are simply a blessing to the world of graphic design.