Thank you so much for this awesome tutorial. I just needed to know how to do masking in general for a project I’m currently working on and your tutorial was absolutely perfect! Thank you!
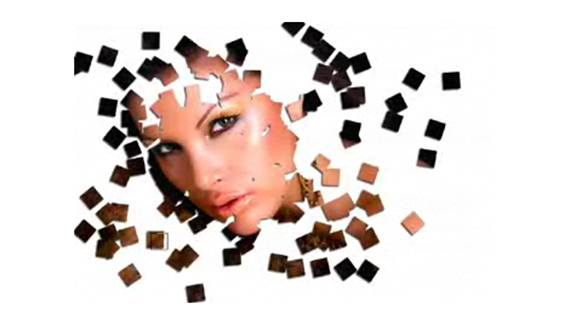
At one point, when you said it was as if the scattering was making the image appear to piece itself together, I immediately thought of the T2 scene when the T1000 broke into chunks and reformed because of the heat nearby. It would be interesting to see a Part 2 to this tutorial will blob shapes rather than blocks, as if the images was forming together like a T1000. Awesome tutorial though.
Hi Corey,
I am a total beginner and still made it in my first attempt…EXCELLENT tutorial and teaching method..please let me know if you tutor any other effects/program and where can I find it(subscribe to) as I am planning to tackle graphic design seriously. Thanks,Adrian R.
Your ma boy I love this effect man your a great teacher and are fun to watch this new years I’m gonna pour a lil’ liquor for you a toast in other words!…I appreciate the tuts!..
Hi Mr. Gorgeous, I mean Corey. Thank you for your wonderful and fantastic tutorial. Here’s another link to my website where you can find my work “http://www.flickr.com/photos/darling/.


i followed all the steps but my brush won’t paint, do you have any idea what i’m doing wrong?
Check your brush opacity and blending mode and you must paint with white otherwise it won’t work
I cant seem to get the scattering option to be selected- its locked and not an option which is highlighted 🙁
very nice corey! thank you!
I am having the same problem as Dannie
Thank you so much for this awesome tutorial. I just needed to know how to do masking in general for a project I’m currently working on and your tutorial was absolutely perfect! Thank you!
At one point, when you said it was as if the scattering was making the image appear to piece itself together, I immediately thought of the T2 scene when the T1000 broke into chunks and reformed because of the heat nearby. It would be interesting to see a Part 2 to this tutorial will blob shapes rather than blocks, as if the images was forming together like a T1000. Awesome tutorial though.
Thanks Corey, your tutorials are awesome. I have learnt lot from it.
Hi Corey,
I am a total beginner and still made it in my first attempt…EXCELLENT tutorial and teaching method..please let me know if you tutor any other effects/program and where can I find it(subscribe to) as I am planning to tackle graphic design seriously. Thanks,Adrian R.
Corey!
Your ma boy I love this effect man your a great teacher and are fun to watch this new years I’m gonna pour a lil’ liquor for you a toast in other words!…I appreciate the tuts!..
Willie
Hi Mr. Gorgeous, I mean Corey. Thank you for your wonderful and fantastic tutorial. Here’s another link to my website where you can find my work “http://www.flickr.com/photos/darling/.
Carmeena
i have the same problem like dianne do you other tutorial can be read
Very useful and straightforward tutorial, thank you.
it is coooooooooool thank you
Thank you so much! I loved it too! Very easy to follow!
Keep up the wonderful work!
Gisèle
:O what’s she leaning on? o.O
Thanks..Good tutorial…really nice..