I used the bread and can’t seem to get the same effect. Most of the bread pictures online are istock with the transparent white lines in it. Haven’t had this much trouble with a corey tutorial since the bevel text beer bottle
You see the transparent white lines because with iStock you must purchase the photo. It’s their way of people stealing without purchasing. You could try Stock Xhng for free textures. 🙂
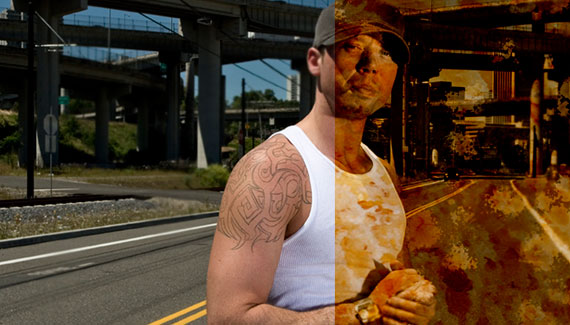
Nice tutorial, I work in restoration so it caught my eye. Love the bread as texture & overall everything works a treat! Thank you for showing us all this technique.
you are the best!! bread texture OMG!! i would never have thought of that i am only 12 years old and i watched most of your videos i wish i could be as good as you . great job 😀
awesome! you made the photo 50-100 years older 🙂 using the bread as a texture was a brilliant idea, I wouldn’t have guessed it if you asked me 😀 I’m only 13 and I hope I have enough time to become like you


The link on the home page takes you to the previous weeks tutorial. I had to click on recent tutorials to get to this page.
PJ
Lol at the bread part and awesome tut Corey and also FIRST!!!!!
good tut
thank!
Cool tutorial, I’d have never thought to use bread for something like that.
I’ve used textures from rusty metal to corn flakes, but I would never think to use bread. Very nice tut!!!!!!!!!!
I used the bread and can’t seem to get the same effect. Most of the bread pictures online are istock with the transparent white lines in it. Haven’t had this much trouble with a corey tutorial since the bevel text beer bottle
I could see useing those brush settings to do tree fungus too.
@Scott
You see the transparent white lines because with iStock you must purchase the photo. It’s their way of people stealing without purchasing. You could try Stock Xhng for free textures. 🙂
Thats an awesome effect
thanks guys
Photoshop CS5 Team
it’s wonderful
really coool video. thnks but where did u bring the first stups that u use while starting
cool cooll
dis is vegy nice
hi, one of obstacles which prevent me with you is that i dont have the picture which u design it in photoshop, pls let us get the picture
what is the web address for the photo??
Err, little confused here.. where exactly can i see these tut’s?
Hey, I dont know how. but my wet edges is blocked.. But it wasnt at first. so how did this come? what did i do?
Can you help me?
Oh nvm 😛
Just made a little mistake there myself already fixed it;)
what about print out and let a view days out in the weather? than scan in again
great effect without PS
This slice of bread is a pretty cool! I should never have thought of that. Huge idea!
nice tout i wish i could be great designer like you
Nice tutorial, I work in restoration so it caught my eye. Love the bread as texture & overall everything works a treat! Thank you for showing us all this technique.
you are the best!! bread texture OMG!! i would never have thought of that i am only 12 years old and i watched most of your videos i wish i could be as good as you . great job 😀
awesome! you made the photo 50-100 years older 🙂 using the bread as a texture was a brilliant idea, I wouldn’t have guessed it if you asked me 😀 I’m only 13 and I hope I have enough time to become like you
Seriously great site, learning alot thx.
that was a good tutorial, great use of bread..
Just wanted to say a big THANK YOU for all of this free information! I am learning so much!!!!
This is really good 🙂 I’m just wondering.. will everything be the same for Photoshoop on Windows tooo?
great ,thanks.
با تشکر از شما بابت این آموزشهای کم نظیرتان
Fantastic, thanks