
Red Eye Reduction with Photoshop CS2
There are almost as many ways to minimize red eye using Photoshop as there are people using Photoshop. Ask a group of photographers which is the best way to minimize red eye and sparks are sure to fly!
Red eye is the condition that occurs when a camera’s flash reflects off the back of a person’s eye. Most common in portraits and group photos, it’s generally a problem when the subject is looking directly at the camera. While most cameras have a “red eye reduction” feature (which uses a pre-flash to shrink the subjects irises before taking the photo), it’s not always practical to use that feature.
In this figure, you see a comparison of five red eye reduction techniques. From the top compare: the original, the Red Eye tool (Photoshop CS2 only), the Color Replacement tool, the Brush tool (using black, the Multiply blending mode, and 60% opacity), the Sponge tool, and the Selective Color command.
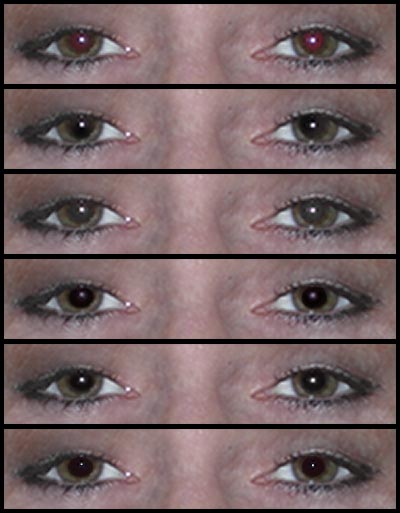
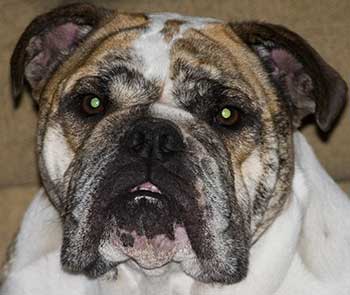
All of the techniques work fairly well – but you may find situations in which one or another works better than the others. For example, if you take photos of family pets, you’ve likely discovered green eye, the pet-equivalent of red eye. Photoshop’s Red Eye tool has no effect on green eye, since it works in part by identifying the color “red.” Here’s an example of severe green eye.
Here’s a look at some excellent red eye – and green eye – reduction techniques:
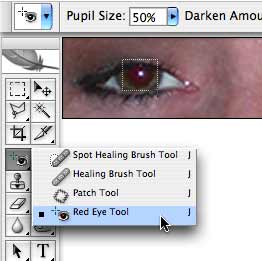
Red Eye tool Borrowed from Photoshop Elements, the Red Eye tool is available in Photoshop CS2. To use the tool, select it in the Toolbox, then drag a small rectangle encompassing the pupil of the eye. (Generally speaking, the default settings are perfectly adequate.)
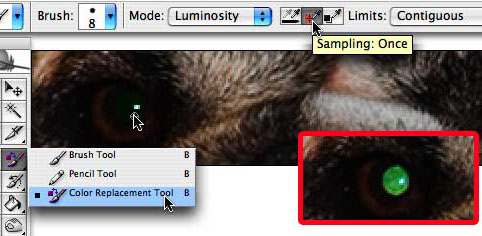
Color Replacement tool Effective on both red eye and green eye, you paint over the pupil manually. In the Options bar, I generally recommend these options:
Brush size: one-third the diameter of the pupil
Mode: Luminosity
Sampling: Once
Limits: Contiguous
Tolerance: 50%
Anti-aliasing: Yes
Click in the red or green area and paint around within the pupil, avoiding the primary reflection.
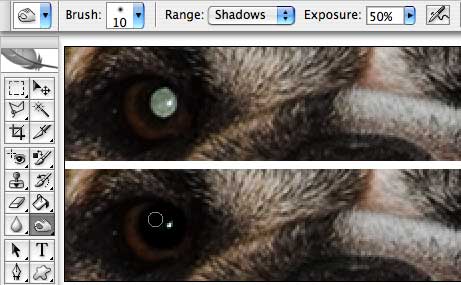
Sponge tool The rarely-used Sponge tool is nested with the Dodge and Burn tools in Photoshop’s Toolbox. This tool enables you to adjust the saturation of areas in your image by painting. To reduce red eye, make sure that the tool is set to Desaturate in the Options bar, and that the Flow is 100%. (Flow determines the strength of the desaturation – how efficiently the tool works.) You can use a brush tip size just a little smaller than the pupil and drag the tool in a small circle within the pupil. Desaturating removes the red from the area, leaving behind a grayscale pupil.

In some cases of red eye (and typically with green eye corrections) the resulting pupil may seem a little too light. Use the Burn tool (set to Shadows and 50% Exposure) to darken the area. (The desaturated green eye is shown above, and below you see the result of desaturating and burning.)
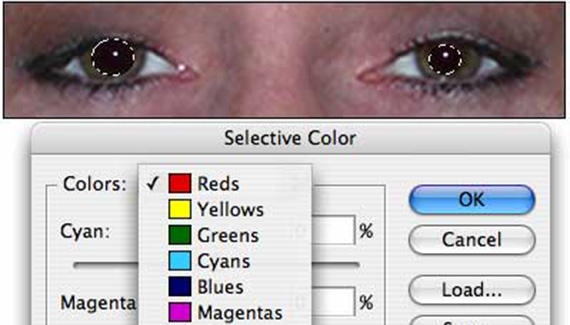
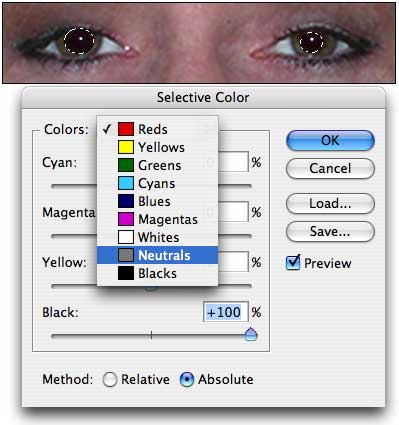
Selective Color You can also reduce red eye with the Image> Adjustments> Selective Color command. Make a selection of the pupils to isolate the adjustment. (Drag the Elliptical Marquee tool around one pupil, then hold down the Shift key and drag around the other pupil.) Click the Absolute button at the bottom of the Selective Color dialog box and drag the Black slider to +100% (all the way to the right). Using the menu at the top, switch from Reds to Neutrals and again drag the Black slider to the right.
So, which is the best technique for reducing red eye problems? All of ’em!

hello