

Have you ever wanted to float a piece of text behind a portion of an image? It’s really easy to do using layer masks. Today I’m going to show you a fun little Christmas card project that will help reveal how useful layer masks can be. Before we get started, let’s talk about what a layer mask really is.
What is a layer mask?
A layer mask is a method of hiding pixels. In my humble opinion, you rarely want to affect or (gasp) delete actual pixels. Instead, what you want to do is to mask them off. As an analogy, think of a layer mask as if it were the masking tape you’d place atop the window trim before painting your walls.
Why should I use one?
Using the analogy of painting your home above, rather than remove the window trim completely (yikes), wouldn’t you rather protect it with masking tape so you can do whatever you want with the walls? Of course you would. The same logic applies to your images. When you want to alter certain portions of the image, rather than delete or affect the other bits, consider masking them off instead. This way you don’t destroy your original image and your artwork remains flexible, enabling you to experiment to your hearts content.
Creating a layer mask in Photoshop
Let’s create a fake holiday card by using this “happy family at Christmas” picture I nabbed from iStockphoto.com.
Step 1: Pop open the aforementioned happy family photo and press T to select the Type tool. Type Happy Holidays, or something similar, in a nice big font in a festive color.

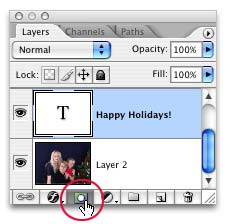
Step 2: Select the type layer in the layers palette (so that it turns blue as shown below), and add a layer mask by clicking the circle within a square button at the very bottom.
Step 3: In the realm of layers masks, painting with black hides and painting with white reveals. Since hiding is what we want, take a peek in your Toolbox and make sure black is the topmost color chip. If white is on top, just press X to swap them out.

Step 4: Press B to select the Brush tool, and pick a fairly small, soft brush from the options toolbar at the top of your screen. Begin painting over the area of text you want to hide, such as the “y” in “Happy”.
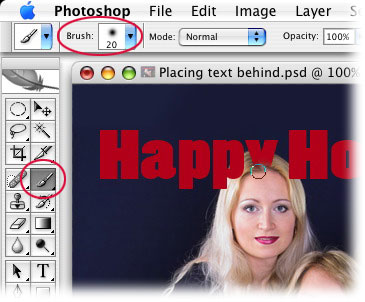
NOTE: The reason for choosing a soft brush (one with a feathered edge) as opposed to a hard brush (one with, well, a hard edge) is so the area between the letter and Mrs. Smith’s hair will be softened slightly, enabling it to blend and look more realistic.
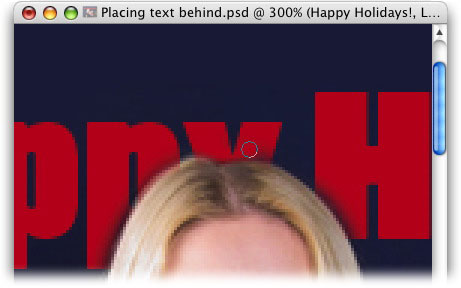
Step 5: If you hide too much of the letters, press X to swap color chips so that white is on top, and paint the area back in. For example, my brush was a little too big so I hid too much of the letters behind Mrs. Smith’s head. I zoomed in by pressing Command + (PC: Ctrl + ) to better see what I was doing, pressed the left bracket, [, to go down in brush size, and I painted those bits of the letters back in, like so:
NOTE: When creating a layer mask, you’ll probably do a lot of swapping color chips, thus alternating between hiding (with black) and revealing (with white) pixels. The beauty is that you’re not deleting any bits of the letters, you’re merely hiding them. This enables you to tweak the layer mask until you get it just right.
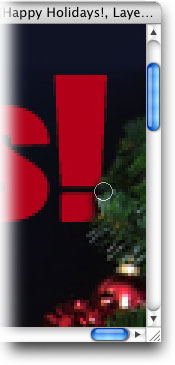
Step 6: Now that the area around Mrs. Smitih’s head is fixed, I’m going to press X to swap color chips so that black is on top, so I can hide a small portion of the exclamation point where it touches the Christmas tree on the far right.
Zooming back out by pressing Command – (PC: Ctrl – ), here’s what the image looks like now. I also added another layer of cursive type to personalize the image:

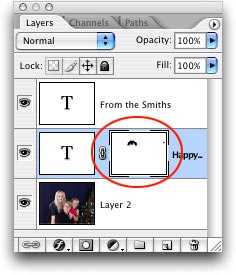
And here’s what our layers palette looks like, with the layer mask circled in red. Anytime you wish to edit the mask, just select it in the layers palette (notice the hairline rule around it below?):
I hope this quick tutorial on using a layer mask to place type behind an object illuminates all kinds of gloriously creative possibilities for your images. Something as simple as what we did today can add that extra bit of spice to an otherwise ordinary photo.
Until next week, have fun playing with layer masks!
The Graphic Reporter
http://www.graphicreporter.com

Oh my goodness, this was fantastic – I only know the very basics of Photoshop, and this was extremely easy to follow, I understood everything and had no problems at all. Thankyou!
Nice tip.
Considering this example, is it possible to anchor the masking to the layer that shows the “head” in the figure so that if you move the type layer, you aren’t forced to “remask” the area?
This is great … but then I wanted to do this effect to type that had a stroke outline, and the stroke continuously redraws around any outline contour of the type, as you are hiding or unhiding, no matter what you do … would love a solution that fixes this so that this effect can be done on type with a colored stroke outline.
Thank You for sharing this info! Helpful indeed! :))
SO HELPFUL! Thanks!