Pin-up Effect
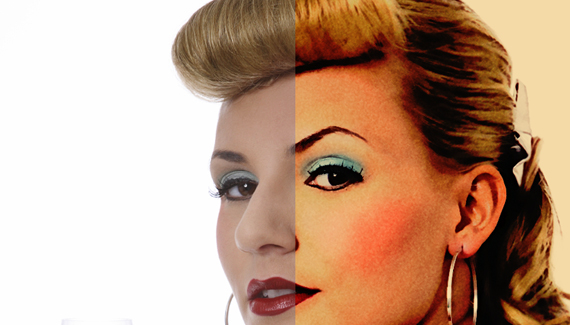
Using a mixture of filters and blending modes, Corey takes a stock photo and transforms it into an old, classic 1950’s pin-up poster.

Using a mixture of filters and blending modes, Corey takes a stock photo and transforms it into an old, classic 1950’s pin-up poster.

WOW! Is there anything you cannot do in Photoshop? Amazing.
This was amazing !
It gave me jsut the look I wanted
for a design project I was doing for someone.
Photoshop GOD !
bloody brilliant!
Could someone please tell me what will be the equivalent of alt+ctrl+tilda key if I want to do the same thing through the menu?
My keyboard is not english, so to press the tilda key, i have to press one other key which ultimately doesn’t work to give that effect that Corey is talking about. Hence I have to go by the menu. In future, it will help if it is mentioned what is the equivalent of the shortcut keys in the menu.
You can also Ctrl-Click right on the RGB Channel in the channels panel.
Awesome Tutorial! I always wanted to do that ^^
Great tutorial Corey.
Great to see this one again! I’d caught it a long time back on youtube and then when I finally actually bought photoshop it was removed for some reason. After searching far and wide I was able to find a spanish language tutorial using the exact technique and did my best to translate, but its a relief to finally have Corey’s original english version.
thts great
Thanks brother man
Hi! Great one… Another one…
For those who don’t have the til (or tilda, in portuguese is “til”) key, I found a solution that helps a lot, even to those that don’t know or have the brackets as a first keystroke in the keyboard. Change the operating system (OS), in this case Windows, to english mode, in the bar at the bottom, near the date and so, instead of your mother language, then, even though you can’t see which simbol has the key in it, you can always press the one that Corey says, like “the havie one next to the number one”, besides that, someone already explained how to select the luminosity, by pressing cmmd or ctrl and the RGB channel!
Well… Bye, and once again, nice tutorial…
Márcio Guerra
Bravo Cory! Can’t wait to try that effect on my images.
I have been looking for a tutorial like this for a year. Thanks so much for this.
I can;t find another word to describe your talent but creative you are,
Nice tutorial but I can only see the beginning of it! After Corey explained how to smooth out the hair with the smudge tool the video changes and instead a comercial fot the magazine “Layers” starts. Please please I really wanna see the end of the turorial, how can a see the rest?
/Mikka
Another Kick ass tutorial by the one and only Cory Barker.
I’m sorry…what am I missing? I’m on a mac and command-option-tilde does nothing for me. I’ve tried this on two macs. I’ve tried it with a shift even (since you need a shift key to make a ~ sign). I can’t find a menu command and Photoshop help doesn’t mention it.
command option 1, 2 or 3 does something….although I’m not sure what’s getting selected, but it’s different for each one. Can anyone help me with this?
BTW, love this tutorial (and this site!) Thanks!
Thanks for all tips the last two years
Its GREAT!!!!
Thanks for all tips the last years. Its GREAT!!!
This is the most amazing thing I have ever seen!
I’m still new to photoshop, so would you mind helping me? I’m a little confused on how you did this part..
How did you “load that selection” (layer 1) “and create a new layer on top of that one? and fill that selection with white?”
Amazing ! Very nice ! Good job
yeah, i have no idea what the hell he’s doing, how do you load a selection, how did he fill it with white??????? I can’t follow this
Omg, thank you -so- much for this!!! I desperately needed it because I edit my own photos and recently had a pinup shoot…….
Thanksthanksthanks… 😛
Learning how to transform a photo into a pin-up girl effect is the coolest tutorial I’ve seen in PhotoShop yet.
Thanks.
This is what I’ve been wanting to do. This and only this. I wonder how long it took to figure this out.
hi! im really interested in this tutorial, i just have one question what is the luminosity step…?
“option command and the wavy line” i tried searching on what is this and i dont understand…
so please, maybe someone can explain!!
I really feel like I should be paying you for these high-quality tutorials… thank you very much!
Wow. Thanks. It’s wonderful to see a pro at work. I’ve got to get those keyboard moves down too. Love it. Thank you so much.
This is a wonderful tutorial. I have used it on numerous photographs and also used it as a black and white. They make great gifts when framed. Thanks a bunch. YOU ROCK!
Baton Rouge, Louisiana
This is wonderful! You’re truly amazing.
Very good, but I use PC, not mac so i get lost when he does the selection on the overlay layer 🙁
“How did you “load that selection†(layer 1) “and create a new layer on top of that one? and fill that selection with white?â€
I did not understand this part either. Maybe Corey will read the comments one day a expand on this tricky part of the video.
I found out the “fill with white” problem after fiddeling around for some time. And you can either press Shift+F5 (on a pc) or go to Edit+Fill(use:White) 🙂
Hope this helps !
Cool!
This tutorial saved my butt (and an iffy image) from a total disaster. Thanks!
You say on this tutorial around halfway. ‘Im going to fill this with white’. How do you do that? Is there a quick key for it?
Russell and Frunced:
I don’t know the short cut but to load the selection go to the select menu and at the bottom it says load selection. A dialogue box will come up. Click ok. Next, click the new layer icon in the layers palette. If you don’t know what that is go to layer>new layer. Select the fill tool (under the gradient tool) and white from the swatches and click over the image. If you don’t know what the fill tool looks like go to edit>fill and select white. Click ctrl+d to deselect. i hope this helped!
By the way, i really enjoyed this tutorial. I have tried making a similar effect but nothing has turned out this polished. Thanks!
OMG you rule! This was brilliant 😀
Muito bom o Tutorial.
valeu….
Superb!
The tilde key for the WINDOWS is Shift + ~ but on photoshop for me it worked as Alt Gr + Shift + ~
Hope this helps
where is the tilled kery? or however it is spelled for me to make the wavy line?
Thank you so much, I have been searching for a tutorial on this effect forever!! You helped me so much thank you for this tutorial.
That is so good! Merci!
Awesome tutorial! thanks so much!
I believe the Opt-Command-Tilde on CS4 has been changes to Opt-Command-2.
The Tilde did not work
Tom Q
that was GREEEEEEEEAAT! TOTALLY GOING TO DO THAT LIKE RIGHT NOW! I LOVED IT! GREAT POST!
here is my picture. this is my first try so please let me know what you think! http://i56.photobucket.com/albums/g179/chelseadaniele/photoschop/pinupLarge.jpg
how do i turn it white??
cool so far!
but how do i make layer 3??
Love your tutorials. The very cool effects plus the fact that you mention all the short cut keys you are using. Excellent!!!!
Can anyone clear up the option command plus the tild key for me. How would I do this on CS4 on a PC not a mac? Thanks
HI, I WAS REALLY EXCITED TO SEE THE EFFECT YOU GOT BUT THE TUTORIAL ONLY LET ME SEE 1 MIN. OR SO. DO I NEED TO SIGN UP OR PAY FOR ANYTHING?
Give it a moment to load. If that doesn’t work try a different browser.
Something is wrong with this tutorial. Everytime he gets to the part where he duplicates the layer and sets it to overlay, and then makes the comment about how saturates the colr is, the tutorials stops and a Layers maazine ad starts. This has done it six or eight times in a row.
what is option command tilda i cant understand that he says. thers no tilda in my key is there any easiest way to get that.?
i looked through all my photoshop and didn’t find something similar like channels or that(near the layers)…
Are You God?!? It’s amazing!!!! love it!!!
great tut! Thanks!
You should post on how to do this on a PC! or if someone could tell me what mac = on pc
I’m using Photoshop Elements 6. I can not get past the Luminosity layer. In addition I am on a PC and not a Mac. When he talks about the option command tilda key…i have tried every combo that I can think of and still cant get it to select the same thing. If someone has a solution for me it would be great!
pretty good!
Amazing! I just love you! 🙂
Very awesome. Can’t wait to try it out!
Love it too but I have a problem with my settings I think^^ When I’m doing “past the selection” (the first time)my background gets black and don’t stay white. That really sucks. You’ve got an idea where my problem is? And I also don’t know how to fill it white. If I do it like the way described from some guys here there is nothing else to see, just white^^ I am german sorry for my englisch.
Great Tutorial! Thanks a lot!
I can’t thank you enough for this tutorial! This is exactly the information I’ve been searching for!
I’m looking forward to view the other tutorials on the site too!
You guys have a New Fan! 🙂
===Steven===>>
thank u very much. i have a beautiful pic of my girlfriend i wanted tattooed in a pin up girl style. im about to jump on photoshop now.
We were wanting something like a Norman Rockwell feeling for our Christmas card this year and this tut is exactly what I needed to make that happen!! Thank you so much!
And thanks to the commenter who suggested “Command+Click” on the RGB channel instead of using the tilda shortcut. Worked like a charm!!
Here’s our end result:
http://i271.photobucket.com/albums/jj131/kristensheets/MistletoeLoRes.jpg
Hey all PC users…to load Luminosity on a pc with cs4…..
Press and hold the Ctrl key with the Alt key then press the number 2.(not F2…just 2)
Don’t quote me on this but I think previous versions of PS may be …..Press and hold the Ctrl key with the Alt key then press the ~ key to the left of the number 1, you may even need to press the shift key too. Someone with earlier PS may be able to confirm.
Pinky
It took me a while, but I finally did it!! It’s an awesome tutorial, thank you for sharing this with us!!!
I also want to thank all the people who wrote explaining some commands, it helped me a lot.
Here you can see what I did:
From this
http://i205.photobucket.com/albums/bb32/laurygilmore/rs627395808199105.jpg
To this
http://i205.photobucket.com/albums/bb32/laurygilmore/fotonatalieportmantutorial.jpg
yo what is the command key im stressing!
layer 3 use > hold down the option (alt key for PC users), while selecting Merge Visible. This copies all the other layers and merges their information onto the new layer.
Awesome, Corey. Just what I was looking for. You rock!!!.
Bookmarked! Totally FAB!
THANK YOU! This was exactly was i was looking for and in need of
Absolutely amazing tutorial!! Worked perfectly!! For ppl having issues with shortcuts just google, say “load luminosity in CS4 (or whatever version you are in as shortcuts do change from time to time) and then your OS.” Should help out a bit! Once again, GREAT tutorial!!
CS2 and 10.4.11.
Cannot get the luminosity selection to happen with the cntrl-opt-tilde key. Not only that, but when I try the ‘merge visible’ option as stated, it doesn’t merge all onto another layer, leaving the layers intact… it goes ahead as if I had asked it to flatten the image.
So… I’m stuck. Help?
the ‘comand’ button on mac its the “apple” button on the keyboard
Probably the best photoshop tutorial i’ve ever seen
absolutely brilliant! I love love LOVE this tutorial and will be using everything I learned here. Thank you so much!
The finished project is even better than the original!
what is i am working on windows? those same keys u press dont work!? what should i do?
If you are working on a mac and have Photoshop cs4 or higher, the current way to do option+command+tilde key = option+command+2.
I just wanted to say that I have been trying to understand how to create the pin-up effect for a long time. I stumbled across this and as I was watching I realized I was holding my breath. This was like a revelation. Thank you so much for teaching it. I can’t wait to take notes and start creating! Thanks again.
THANK YOU!
Great tutorial! 😀
You saved my boyfriend’s Christmas!
Haha, amazing, I love it.
Thank you! A growing part of my business is boudoir and pin up photography. I just shot a client that wants a true old school pin-up look. This has grown my method by leaps and bounds and I can’t wait to show these photos off!
awesome dude,
Please help. I can not seem to make the Tilde Key Work in Photoshop. If I hit Shift & ~ I get the symbol, when trying to compose on email. I tried in Photoshop by pressing OPT + CMD + ~ and nothing happens. I also did the following and turned on the Keyboard Viewer by going to:
Apple menu > System Preferences, click Language & Text, and then click Input Sources.
Open the Input Sources pane of Language & Text preferences
Select the Keyboard & Character Viewer checkbox.
Make sure the checkbox next to each input source you want to use is selected and that “Show Input menu in menu bar†is selected.
Still nothing happens. What am I doing wrong? Should I re-boot or am I missing something.
Thank you in advance!
Hi Gary! Well… ty 4 tha demostration, Thats exactly what i looking for…
i appreciate your time and think about how to help others
THANK YOU VERY MUCH…
love this. thank you.
pin up is 1940s btw.
To load the luminosity in Photoshop CS4 its command + option + 2 (not tilde)
I get half way through this tute and for some reasone cannot select Filter > Sketch.. its greyed out.
It’s a good tutorial but neglects people that have a PC or do not know where to find all the shortcuts. Would like to see a tutorial that also has a PC version.
You can just open the Channels panel and hold down the Ctrl key while clicking the RGB channel icon. It does the same thing.
Awesome tutorial, thanks
Amazing!! Thanks for sharing!! I love it!!!
You are a truly master. This is a first time to leave some comment, but I have to do here. Thank you.
Hi,
like this tut. It’s amazing… but there is one point that I can’t understand. At position 3:57 I can not understamd , what you are saying… something like “by pressing option, command….”
I am sorry, but english is not my motherlanguage. 🙂 So I hope, you can explain the right description to me. 🙂
Thank you and best regards
Paul
Nice and clear, thank you!
Lájk
Just about to start looking into pin-up photography, so this is a great start! Thanks….
Help!! Im trying to merge the layers for step 3 but when I hold down the Alt key it wont allow the Layer tools to stay up…?
Thank you for this post, I made my version thru this link:
http://diary.ilvstrated.com/2011/08/pin-up-girl.html
The tutorial is very clear and easy to follow, though I’m not saying my work is perfect teehee 😀
Oh, this is awesome tutorial. Thank you a lot.
What photoshop did you use?
Because I recently bought CS5.
All I have to say is thank you so much. I scour the internet for tuts all the time and have to sift through really bad to ok but too long and complicated to follow or missing instruction. Your tuts are short and easy and produce amazing results. Like teaching should be. Anyone looking to create a tut please follow this man and do not clutter the internet with pap. Thanks!
Where is the tutorial.? It is not showing.
This has been fixed.
Thanks
Web Editor – PlanetPhotoshop
“Video not found or access denied” ???
I love your voice!
Thanks, this is a great tutorial!
Maybe I am doing something wrong. My image went way to contrasty after all the changes….. Maybe it only looks good on very high key images…..??
At 4:30 “…Now, gonna load that layer as a selection…” I don’t get the marching ants. It worked earlier when I loaded the luminosity. I’m using CS6. Thanks!
Can you tell me the significance of choosing the red skin tone for the sketch step? I don’t know what color to select from my picture.