Thanks for hitting this topic! It’s really helpful. Using the Multiply Blend Mode is brilliant! I’ve used this technique before and have run into issues at times where my parts of my subject and the background both come out the same tone of gray in the Alpha channel. The overlay brush become relatively useless at that point. Any suggestions on how to make accurate selections in this scenario?
Another useful set of tools are Dodge and Burn. Set the Burn to Shadows and work on the blacks in the mask and set the Dodge to highlights and work on the whites. I’ve been using the calculations for the past six months or so. Works wonders.
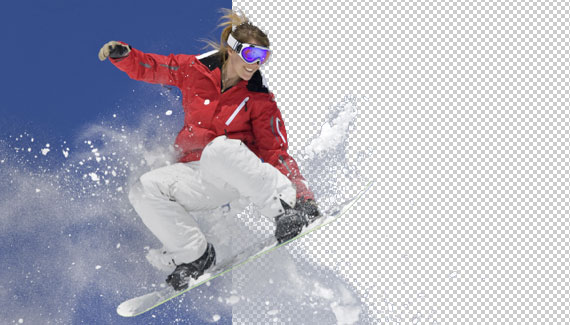
Well this is good when you have a solid background with a whole other light than on the subject but if there is a shadow or anything around the edges of the subejct that connects it to the background in a toning way, it doesent work that well.
Just when i think u did enough u come out with this awesome tutorial that, i would say 98% of the ppl have trouble with, is not only amazing but easy to do. Just keep up the good work.
Dear Admin,
Thanks a lot about the nice website and cut information what you provided to us really its amazing corey, simply awesome also i want share my colleagues in from your website complete and free full DVD photshop Training videos ad an other software its free for graphic designer a gin thanks
take note website link : http://www.ebooks.allnewthings.com
Dear Admin,
Thanks a lot about the nice website and cut information what you provided to us really its amazing simply awesome also i want share my colleagues in from your website complete and free full DVD photshop Training videos ad an other software its free for graphic designer a gin thanks
take note website link : http://www.ebooks.allnewthings.com
Yes i agrre selecting with channels is somtimes very usfuel but i wish u wouldnt always use the best passible image for doing things like this to show someof the more problams ppl get with day to day shots
I WAS WATCHING WINTER 2010 OLYMPIC AT NBC. IN THE BEGINNING SOME TIME NBC SHOWS SPORTS FIGURES INTO ICED BLOCKS FRAMES.WHICH LOOKS BEAUTIFUL.IT IS POSSIBLE FOR YOU PRO TO FIGURE HOW THEY DID ,MAKES,CREATED, THEM.
AND OF COURSE MAKE A VIDEO.
I KNOW YOU CAN DO THAT..
YOUR BIGGEST FAN,
RAZ
That was really a nice tutorial for removing complex backgrounds.
What really like is the little cool trick of unlocking the layer 😉
I really love Photoshopusertv.com as well.
I enjoyed this. A lot to digest and channels and calculations have always been part of Photoshop and a very powerful one at that. We can also duplicate our images and change the mode (Lab, CMYK etc.) to find mask candidates and calculate them into the original doc.
you can turn the alpha channel into a selection more easily by just clicking one the little picture of the alpha channel while you press the Cmd/Ctrl button. channel masking rules!
So gonna be using this in future. How many times have I had to really quick and dirty rough visuals with dodgy cutouts to put in front of a client explaining that it will be finished properly in final a/w.
I’d been burning and dodging the alpha channel for more precise selections but this masterful use of the blending modes is pretty exciting. Thanks for the introduction to the calculations tool, too.


Awesome, thank you. I’ve never really figured out how it worked until now 🙂
very usefull! Thanks.
Thanks for hitting this topic! It’s really helpful. Using the Multiply Blend Mode is brilliant! I’ve used this technique before and have run into issues at times where my parts of my subject and the background both come out the same tone of gray in the Alpha channel. The overlay brush become relatively useless at that point. Any suggestions on how to make accurate selections in this scenario?
Wonderful tutorial. I agree that Channels is the best way to do more complex things. For simpler things I like the pen tool.
amazing corey, simply awesome
btw, why didnt you just use levels in the first place?
this tutorial was great! wished i would of seen this when i 1st started… great stuff!
cool thing about Corey is that he add a little humor in every tutorial….btw nice job 😉
Awesome! Very helpful!!!! Thank you very much.
Another useful set of tools are Dodge and Burn. Set the Burn to Shadows and work on the blacks in the mask and set the Dodge to highlights and work on the whites. I’ve been using the calculations for the past six months or so. Works wonders.
Outstanding. Very detail. Cheaper than a
third party plug-in, it’s always there.
Long overdue.
Thank You
How do you change the gray background to a picture? not the picture, but the background of the actual program.
very nice!
I always want to know how they rendered it..
THX
Well this is good when you have a solid background with a whole other light than on the subject but if there is a shadow or anything around the edges of the subejct that connects it to the background in a toning way, it doesent work that well.
Thank you for posting this, this is going to be a very useful technique.
A true time saver.
Your tutorials are great, thorough and easy to understand.
Erik.
Great! And I love how your voice isn’t boring 🙂
Sry, meant Picture. None of them have had the right amount of snow
Very well done, I actually tried it and got it on the first try.
Gotta love Spaces on Leopard, made easy to go back and forth.
I wish you’d see the movie “Tell Tale” and then do a tut on the movie poster!
I just finished watching the video on Law Abiding Citizen, great tut! Love this one too!
Thanks
Debbi
one of the best and useful tutorials I’ve seen, thanks for sharing!
HP
awesome tutorial. Thanks 🙂
Just when i think u did enough u come out with this awesome tutorial that, i would say 98% of the ppl have trouble with, is not only amazing but easy to do. Just keep up the good work.
Thanx for this tut.
Dear Admin,
Thanks a lot about the nice website and cut information what you provided to us really its amazing corey, simply awesome also i want share my colleagues in from your website complete and free full DVD photshop Training videos ad an other software its free for graphic designer a gin thanks
take note website link : http://www.ebooks.allnewthings.com
Kind regards,
Said Abdulllah
Dear Admin,
Thanks a lot about the nice website and cut information what you provided to us really its amazing simply awesome also i want share my colleagues in from your website complete and free full DVD photshop Training videos ad an other software its free for graphic designer a gin thanks
take note website link : http://www.ebooks.allnewthings.com
Kind regards,
Said Abdulllah
Yes i agrre selecting with channels is somtimes very usfuel but i wish u wouldnt always use the best passible image for doing things like this to show someof the more problams ppl get with day to day shots
I WAS WATCHING WINTER 2010 OLYMPIC AT NBC. IN THE BEGINNING SOME TIME NBC SHOWS SPORTS FIGURES INTO ICED BLOCKS FRAMES.WHICH LOOKS BEAUTIFUL.IT IS POSSIBLE FOR YOU PRO TO FIGURE HOW THEY DID ,MAKES,CREATED, THEM.
AND OF COURSE MAKE A VIDEO.
I KNOW YOU CAN DO THAT..
YOUR BIGGEST FAN,
RAZ
Amazing corey…simply amazing..
Thank you, that is an awesome video. This will help me will my project for college.
very cool.
Awesoome! You’re The Best!
thats i like to snow borard
Fantastic, very helpful, as always!
Many thanks
Thanks, this is something I need to work on for lifting models off my studio background, you did a good job with this tutorial.
Great tut, I can’t wait to try it on one of my images! Keep up the great work!
Absolutely fantastic, Corey. Thank you sooooo very much.
Good stuff Cory! I totally forget about the calculations panel sometimes.
Big thanks for this and your other tuts! They are very awesome. I understand now about alpha channels.
Thanks Core,
That was really a nice tutorial for removing complex backgrounds.
What really like is the little cool trick of unlocking the layer 😉
I really love Photoshopusertv.com as well.
Keep it up good work,
321webdesigner
http://ruakbar.deviantart.com
I enjoyed this. A lot to digest and channels and calculations have always been part of Photoshop and a very powerful one at that. We can also duplicate our images and change the mode (Lab, CMYK etc.) to find mask candidates and calculate them into the original doc.
you can turn the alpha channel into a selection more easily by just clicking one the little picture of the alpha channel while you press the Cmd/Ctrl button. channel masking rules!
Wow, thank you so so very much Corey. I am very grateful to you for sharing this tutorial.
Bookmarked for future reference 😀 You are a good teacher Corey, you make the complicated make sense!
Looks so easy that I’m gonna try it 😉 Thanks for sharing!!
Ahh, thank you so much! It took me forever to select something out of a photo before, but this really helps me for the future 🙂 thanks again ~
Thank you so much. This is a great tutorial.
So gonna be using this in future. How many times have I had to really quick and dirty rough visuals with dodgy cutouts to put in front of a client explaining that it will be finished properly in final a/w.
Wicked tutorial, more please.
WoW.. That’s so awesome ^_^
I never thought it could be extracted from there…
It would be impossible.
But you made it Possible man…
NICELY DONE!
Many Many Thanks to you!
I knew this technique yet, however the video is an exacting one with excellent quality!
Great!!!!
Oh… Very thanks Corey. This stuff is great i waste so many hours of work doing this in different ways.
Corey this is great! Thanks for the awesome steps, this will definitely improve my rendering skills. 😀
I’d been burning and dodging the alpha channel for more precise selections but this masterful use of the blending modes is pretty exciting. Thanks for the introduction to the calculations tool, too.
You are really good at this! Thank you very much! As Amanda said “Bookmarked for future reference” 😉
Fantastic!! tnxs, Corey
any idea why is my extraction result always has a bit of transparent effect in some area ? (especially Black coloured area)
how you set the blue baground on your workspace
cool tutorial and cool website.. 🙂
awsome i think this could help in complicated situation ….100% good manner of selecting
Top class video, Thanks.