
Knockout 2
Knockout is the leading masking program that Corel Corp. acquired from a cinema bluescreen company, Ultimatte. KO enables you to remove an object from the background in a similar fashion to the extract tool in Photoshop. However Knockout is a much more powerful tool and enables you to remove “impossible” objects like glass, liquids, hair and smoke.
Documentation is superb, with a full color manual and an updated quicktime tutorial on the enclosed CD. In about 15 minutes I was ready to try out the software.
Installation was a snap on OSX as the product is fully carbonized for OSX. To date, Corel Corp. have more products for OSX than any other company. (It also works on 8.6 and up and Windows 98, 2000 and XP.) Knockout 2 is the 3rd Program to be released from Procreate. Procreate is a new branch from Corel which handles the professional graphics side of things. The previous 2 releases are Painter 7 and KPT effects.
The first improvement to strike me immediately is that Knockout is now a plug-in instead of a stand alone product. This saves a lot of time and hassle with alpha channels. Another great improvement is the memory hungry beast has been put on a diet. The folks at Procreate have reduced its memory demands, and anyone who has used 1.5 on the Mac can now allocate that RAM somewhere else. It also now supports CMYK images.
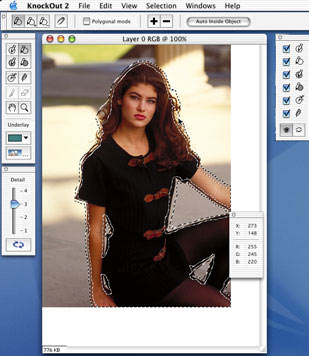
Using Knockout 2 is more streamlined than before with the addition of Photoshop Shortcuts, no more having to learn a whole new arsenal of keyboard tricks. It did a splendid job of quickly lifting this image.
KO is fairly easy to use and had 4 different levels of masking. I was surprised to find that version 2 doesn’t just have a lot of usability enhancements but also does an even better job than 1.5 of detecting the edges of an image. If you don’t get the image quite right there are tools that enable you to fine tune the selections.
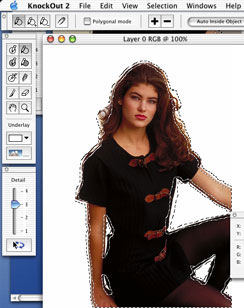
There is also the welcome addition of the “touchup tools” yes, we now have a paintbrush and eraser tool for quick fixes, this is one of my favorites. You can view your work as an alpha channel or choose different colors to display against your masked image, you can even choose another image as the background. If you totally mess it up you can revert the file and there are now 99 levels of undo.
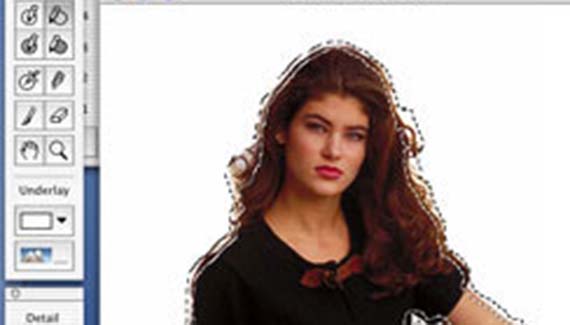
If you look at the close up here, you can see how clean the masking is around the hair. I was very impressed with the results. With a little practice and time you could remove almost anything.

My conclusion is that Knockout 2 is well built and the new features certainly make it worth the upgrade. It is a strong program that does what it is designed to do very well. If you are a professional designer who regularly extracts images from their backgrounds it is a must buy. The only draw-back is a pretty steep recommended price of $329 and the upgrade for US$149.
In my review of Knockout 1.5 I said “with a stronger undo feature, 1.5 would receive a solid 5 out of 5.” Version 2 definatly deserves that rating.
Until next week, see you at the café www.photoshopcafe.com

Good Evaluation.. But I am looking for a Tutorial on how to use KnockOut Plugin in Photoshop CS3. 😀
what is the serial key for thiss plzzz tell me,,,:(
KnockOut 2 work any more on Mac OSX10.6.2 (snow leopard) Why ?
Is there a new one ?
Or an upgrade ?
Thank for answer me.
I have photoshop CS4 and as far as i now KnockOut2 doesn’t work on this.
I also run leopard.
I have an option to install carbon or non-carbon, not sure which one to do, or if it will even work.
i need this