Most excellent again. Your tallent is beyond the best of the best. I love how you can teach and make it so simple to understand. You creat something from nothing. Your brain must never sleep.
Hey Corey, been coming to your site for a LONGGGG time. I have a question for you. Every single time I watch your tutorials I look at your swatches palette and wonder where you got it. It’s like the ramp, but in swatches. I’ve looked through all the presets and haven’t found it so I was wondering if you or anybody else could point me to that particular swatch set. Thanks!
lol, that is so cool. Just when you used the burn tool, it all looked 3D and the picture was on a whole new level. Thanks for the inspiration, you’re truly the best.
Warp Tool…Render Fibers…Liquify Tool…must upgrade my PS!
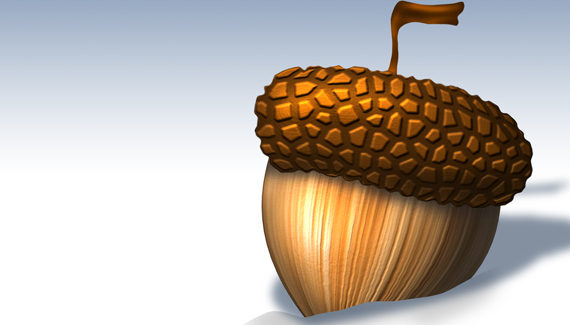
I love the little details that you put in that make a good image great like the alpha channel lighting tricks and the notches in the acorn cap. Sometimes the smallest details can make such a big difference.
Off topic– will you ever make the video aspect of your site compatible with the iphone? That would be super cool, because you are a wealth of information and generosity!
Corey, whens the July Competition start ? i’ve been waiting anxiously for a post and haven’t seen one yet. I posted here as i don’t know where else to post the question. I know it’s only the 5th but hey it’s the 5th lol 🙂
😀 Great tutoiral!
Normally I use Gimp ( GNU image manipulation program) but I decided as a change to download the free trial of PS CS4
One question : On PS do you have a layer mode opetion named ‘ overlay’ its very much like the dodge and burn tool but on a new layer and you can alter it without touching the layer underneath?
very nice. what is a way to do lighting effect without using that filter? In cs5 64bit intel puter It has been taken away! for now anyway, no more lighting effects filter.


Sweet Tutorial Corey, as usual awesome! I love the “illustration” tutorials, too bad I do not have a tablet!
wow, easy techniques with a great effect. stunning endresult
Wow very cool!, great tutorial keep them coming!
Most excellent again. Your tallent is beyond the best of the best. I love how you can teach and make it so simple to understand. You creat something from nothing. Your brain must never sleep.
Fantastic tutorial Corey! I really liked the technique where you used channels to enhance the texture, keep up the good work. 😀
Hey Corey, been coming to your site for a LONGGGG time. I have a question for you. Every single time I watch your tutorials I look at your swatches palette and wonder where you got it. It’s like the ramp, but in swatches. I’ve looked through all the presets and haven’t found it so I was wondering if you or anybody else could point me to that particular swatch set. Thanks!
Thanks Corey, i hadn’t seen the “alpha channel” technique yet and will most definitely make it into my artwork from no on 😀
The movie is great and so is this tutorial!
As always, its just awesome. Never thought this can be doing in PS 😉
Wow-so many new techniques that can be applied to other pieces of art.
Now, if I can only remember all the steps involved!
Great tut! Thanks for doing it, and for the shout-out.
lol, that is so cool. Just when you used the burn tool, it all looked 3D and the picture was on a whole new level. Thanks for the inspiration, you’re truly the best.
as i have said many times before… your are the photoshop God. all of your tutorials are brilliant and help me more than you can imagine.
thank you sooo much corey, keep it up
cool tutorial ,as usual awesome….good work…well done 🙂
simply your are father of photoshop man
Warp Tool…Render Fibers…Liquify Tool…must upgrade my PS!
I love the little details that you put in that make a good image great like the alpha channel lighting tricks and the notches in the acorn cap. Sometimes the smallest details can make such a big difference.
Off topic– will you ever make the video aspect of your site compatible with the iphone? That would be super cool, because you are a wealth of information and generosity!
Corey, whens the July Competition start ? i’ve been waiting anxiously for a post and haven’t seen one yet. I posted here as i don’t know where else to post the question. I know it’s only the 5th but hey it’s the 5th lol 🙂
One of your best…amazing! Keep the “from scratch” stuff coming please.
Amazing! I love how you started with base shapes then warped instead of drawing out the finished shape. The liquify step took it to the next level!
As always you make it look so easy. Because of you I am a warping, dodging & burning mo-fo! Thanks for making me a better designer.
-rafael
😀 Great tutoiral!
Normally I use Gimp ( GNU image manipulation program) but I decided as a change to download the free trial of PS CS4
One question : On PS do you have a layer mode opetion named ‘ overlay’ its very much like the dodge and burn tool but on a new layer and you can alter it without touching the layer underneath?
Bravo.. one of the best I’ve seen
Mind Blowing Corey !
Awesome Cory….you are da PS god!! Love the alpha channel trick.
simple but very effective … you definitely make learning photoshop an interesting adventure with your weekly tutorials
Really you are my favourite designer
you are a genius
if you can teach me wich you know…………
Thanks Corey, you are a genius!
Thanks Corey, you make it sound so simple.
HM Patel
Great Tutorial Corey, It’s a shame I can’t download them like layers and photoshop from you and Scott, Mat and Dave.
Great Thank you very mush
Cool, it s very useful
Awesome Corey! very easy to understand thank you so much for helping us like this you are Awesome!
Thanks friend
CJ
Very, very nice!
Great tuts!!!
cool love it
this makes photoshop a blast!
Great tut. very nice
How do you come up with stuff like that???????OMG.
Thanks great tutorials and very perfect way share the ideas i pick it very easy.
very nice. what is a way to do lighting effect without using that filter? In cs5 64bit intel puter It has been taken away! for now anyway, no more lighting effects filter.
Hello Corey,
I am so happy with the end result! It is a little different than yours, but, I got the idea!
I learned a few new things with this tutorial!
Merci beaucoup… (thank you very much) and keep up your good work
gazelle
That was awesome! Thank you so much for sharing these cool videos.