
Changing hair color is often simply a matter of adding a Hue/Saturation adjustment layer. However, when the hair needs substantial lightening, such as when converting from brunette to blond, the Selective Color command may be more effective.
When starting with blond, a simple “dye job” can be provided with a Hue/Saturation adjustment layer. Check the Colorize box and adjust the sliders for the look you want.

The original is on the left. In the center, the Colorize box was checked in the Hue/Saturation dialog box and the sliders were set to Hue: 20, Saturation: 35, Lightness: -55. On the right, with Colorize checked, the sliders were set to Hue: 15, Saturation: 57, Lightness: -31.
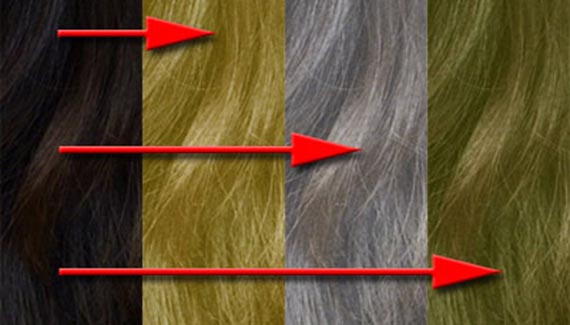
Going from dark hair to light presents some additional challenges. Sometimes the Lightness slider of the Hue/Saturation adjustment is suitable. Other times you may have good luck with a Curves adjustment. But your best bet may be to head straight for a Selective Color adjustment layer.
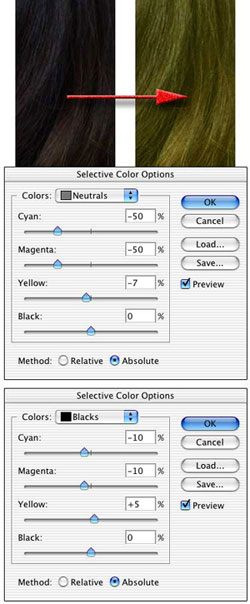
When the Selective Color dialog box opens, click the radio button “Absolute” at the bottom, then at the top, switch the pop-up menu from Reds to Neutrals. Reduce the Cyan and Magenta content proportionally, then balance the appearance with the Yellow and Black sliders. Switch from Neutrals to Blacks and repeat.
The correct values depend both on your original image and your intent. The same original dark hair can produce a variety of lighter looks with this technique.
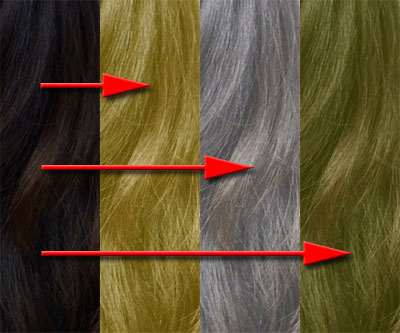
The original is on the left. The three adjustments are, from left to right: Neutrals -50/-50/0/-80 & Blacks -47/-42/-16/+25 Neutrals -50/-50/-40/-82 & Blacks -50/-50/-50/+50 Neutrals -50/-50/-56/-4 & Blacks -50/-50/+39/+63

woot thx