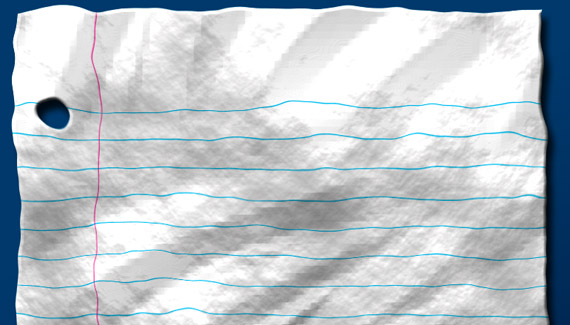
This crumpled paper effect starts with designing a piece of notebook paper and then applying a displacement map to create the texture. Finish the effect off with some layer styles to give it depth.

This crumpled paper effect starts with designing a piece of notebook paper and then applying a displacement map to create the texture. Finish the effect off with some layer styles to give it depth.

Great.. thanks for sharing
Corey for President! By far you have the best tutorials on the block. Other ones I see always skip a step or so. You streamline it for everyone. Please dont ever stop~!
Thank you Corey for this tutorials and keep going,,,,,, God bless you man 🙂
You have my vote Corey 🙂
If I could find more tutorials of yours I’d never leave the PC xD
More tutorials! Corey rocks!
Very KOOL! You are the BEST! Keep coming up with great TUTS.
Count my vote also
Agree with GabyB. This one was was devastatingly simple in execution but the underlying principles profound. I like the idea of being able to use the simple scaled page and making a template by punching out shapes or text for example. It is often a great way to learn of techniques to apply to your own work that wins the day with these tutorials rather than just repeating them.
Cheers,
Gary.
Hey Barker very kool stuff man keep doing them. I have one question to ask how do you change the photoshop animation box to act like the flash animation key frame. Also how do save an animation created in photoshop cs3 as a flash file.
good work mate
Wow thats greeeeeeeeeeeeeeat thanks!
=D
you do know how to please us.
u rock bigtime!
Tnx man!
Wow! Excellent tut! I learned a lot from this one. how to use displacement…what the hell a smart object is…this is great!
Ill be looking around for more of your tutorials!
the only issue i had was converting the keystrokes from Mac to PC…but thats not really that big of a deal!
thanks again, mine came out awesome!!
with regard
josh
Hey, Do you think you can make more easier things like the flames and shooting stars?
Genius
A great idea. I like the idea of the “smart object” effect.
Thanks
David 🙂
its very interest for learn expecially me the beginner, thank’s so much , i wait for the next idea.. by wassalam
just iwant to say that you got great website for this program & thankfull for you
this is at least i can say
salam
i have always wanted to do the crumple trick
.it was great thanks.
Wunderfull, thank you. Greetings from the Netherlands.
My lines become unevenly spaces as i shrink the first layer.
you rock!!!!!!!!!!!!!!!
When I use the eliptical marquee tool it automatically deletes the background before I move it. Help?
Hi..i was really doing well on this and got very upset cuz i was enjoyinh this, till it cuts off…i was wonderign if u could chek this problem out, im not sure why its doing it but i really want to finsih this project, thank u
you have really boarding light to my way. God bless you, but i wish i could get the video so that i can play it on my notebook…. Jah Bless
When using the marque tool to fill in, how do you get it to automatically fill in the blue lines when pressing ctrl+alt+t, because i have it moving down, but not filling in the as it goes
I’m on a PC.
What do I click to fill my lines?
where are we meeting??
YOUR AWESOME COREY!!!!!
my hero… almost
What a fantastic tutorial.
T e felicito por tus excelentes tutoriales, lo unico malo es que no esta en mi idioma ahora te pido de favor si es que me podrias decir como hago para que mi sellecion de marco de fila unica se convierta en una linea celeste este tutorial esta en Crumpled Paper – Effects Tutorials Videos – Planet Photoshop dime cual son las teclas de acceso directo o ayudame de alguna manera muchas gracoas y otra ves gracias.
Just what i was looking for.
Thanks for sharing.
The application of the Filter / Distort / Displace at 07:41 has no effect in CS3 exteneded.
I went through the entire tutorial again just to be sure I didn’t miss something. It just does absolutely nothing. Bummer.
I can apply other filters and they show as “smart filters” but the Distort / Displace? It’s like it’s not even there.
Great tutorial. One question though. Is there anyway to control the weight of the line that is put down by the Single Row Marquee Tool. My lines look so thin its hard to see. Appreciate it and keep up the good work.
I don’t think I would use this, because paper doesn’t crumble in nice forms en waves. Crumbled paper is made up of a (sometimes very dense) collection of squares and triangles. The paper in this tutorial is simply too elegantly ‘crumbled.’
This did not work in CS5. How do you do this in CS5?