Hi..I love this tutos but I’m not understand perfect English and sometimes is difficult to me understand what keys must be press….would be userfull if you include a tool for display the key press..thank so much and good luck
Corey,
I am inspired over and over again on new by your Tutorials. Not only the contents, but also your entertaining way provide for the fact that I inhale everything literally.
When I do the layer mask on the glass, it will not let me erase the background. i am unsure of what i am doing wrong. everything looks the same. the background, all the layers… but when i go to use the brush tool, it does nothing…. help!!!!!
it’s just more than what i expected..like a dream. I’ve seen a lot of these work but i can’t understand how they do it and you came and lighten us with this tutorial
Hi, great tutorial, as usually. It’s a pleasure to learn with.
But I’d like to have a precision, cause i’m french (and also cause I’m quite amateur in PS) and, even if I follow you in your explainations, I some times need more precisions about the actions you made . In this case, I don’t understand which keys you pressed, in the action at about 6:45. Could you write me the combinaison of keys to press and actions to do, please?


Awesome tutorial once again, thanks.
Time for me to go have some fun with it 😀
Great video, but it cuts off right when you’re about to clip the two layer masks together. Is there another part to this somewhere?
Hi Mike , After the clipping part, Just Add a Text of your Choice to the whole design.. and we are done !
Cheers !
very nice this tutorial thank you …
Very NICE This TUTORIAL thak you ..
this is amazing can’t wait to try it out
VERY cool!
and I totally burst out laughing at your announcer voice with “a broken man”. ha!
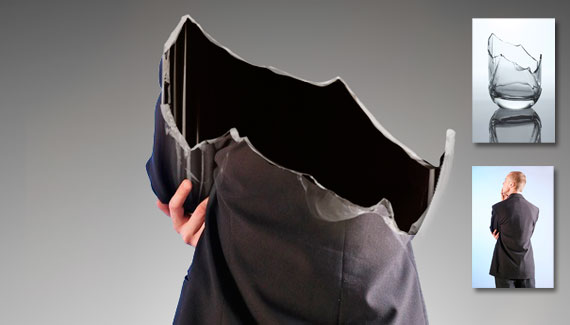
Great tutorial!! Where do I get the broken glass????
always waiting your next tut, nice work, sir (risin’ hat)
very good tutorial can’t wait to try it out.
BTW. Where did you get the broken glass.
Thanks.
wow! Thanks!
Regards And God Bless! 🙂
i love this tutorial… looking forward to more!
Hey,
great tutorial.
How can i have a it in full?
Respect 2u.
Just Fantastic!
Great tutotials.
How to download this whole vedios.
Hi..I love this tutos but I’m not understand perfect English and sometimes is difficult to me understand what keys must be press….would be userfull if you include a tool for display the key press..thank so much and good luck
Corey,
I am inspired over and over again on new by your Tutorials. Not only the contents, but also your entertaining way provide for the fact that I inhale everything literally.
Thank’s Mike.Great tutorials.Always Waiting Your Next Project.God Bless You
Thank’s Mike Always waiting your next Project.God Bless You
åšçš„真的ä¸é”™~~很喜欢
Very nice tutorial! Thanks 🙂
You do the best tutorials I have ever seen!!! Thank you very much for all your hard work in sharing your knowledge with us. Cheers!!!!!
Isn´t that old stuff? Just take a look at the poster of the movie “The Broken”: http://dormitator.files.wordpress.com/2009/06/the-broken.jpg?w=455&h=606
Nice effect Corey. Pretty simple to accomplish and it looks perfect.
thanks. 😀
I’ve been trying to figure out how they did that for awhile. I’m glad I know now. Thanks! Any chance you can teach textures on skins and such?
Amazing tutorial!… seems very, very easy!.. Transparency with masks..
Regards
Excellent tutorial, lots learnt, must just go try it now 🙂
cheers,
Very very nice !!! Thanks
When I do the layer mask on the glass, it will not let me erase the background. i am unsure of what i am doing wrong. everything looks the same. the background, all the layers… but when i go to use the brush tool, it does nothing…. help!!!!!
Forget the last question i figured out that the background color had to be WHITE.
Where can I find the picture of the GLASS??? Google is no help there…..
Corey,
Thank you for the amazing tutorial….
By the way can you tell us how to change the UI color of Photoshop like you did?
Supercool tutorial! And great commentary!
Check out mine, which could not be made without this awesome tutorial:
http://mbenjo.deviantart.com/#/d2yutn7
WHERE CAN I FIND THE GLASS IMAGE. I HAVE BEEN LOOKING FOR DAYS FOR A GLASS AND THEY ALL SUCK.. PLEASE HELP.
I can’t say any thing..(No comment)
it’s just more than what i expected..like a dream. I’ve seen a lot of these work but i can’t understand how they do it and you came and lighten us with this tutorial
thank you so much sir and god bless you
“A Broken Man”… coming up next! 😀
Great!
Corey — you are incredible. Thanks!
Hi, great tutorial, as usually. It’s a pleasure to learn with.
But I’d like to have a precision, cause i’m french (and also cause I’m quite amateur in PS) and, even if I follow you in your explainations, I some times need more precisions about the actions you made . In this case, I don’t understand which keys you pressed, in the action at about 6:45. Could you write me the combinaison of keys to press and actions to do, please?
Thank you in advance 🙂
Really good tutorial, nice and easy for begginers to pick up some of the basic techniques in photoshop. Good job!
Glaziers High Wycombe