Great tutorial but what where I am loosing you is when you put the gradient above the cloud layer. You don’t seem to be using any transparency or blending mode but yet in your tutorial, it doesn’t cover up the underlying layer of the cloud layer. Why? It does when i try to follow along. I had to change the blend layer of the gradient layer to Multiply to get it to look like yours. What am I missing?
Make sure you are using a foreground (black) to transparent gradient. If you look closely, it does apply some darkness over the top of the cloud layer, and gradually becomes more transparent. Make sure you start the gradient below the bottom of the image and go straight up. If you begin the gradient above the bottom of the image, it will make it completely black, then gradually transparent.
I’m having the same problem as Houston.. and I read Gman’s response, and tried it, and I still get a completely black cover, no gradient…. I have the right gradient selected, but still no black to transparent shows up… can’t figure out what I’m doing wrong. Could my gradient file be corrupted, although I tried to create my own and still have the same problem. I’m working in CS2, could that be the problem.. any help would be appreciated, it’s very frustrating when I follow step by step and can’t get it to work.. In fact I’ve tried all the gradient that have transparency in them and none of them work.. maybe I have some setting that isn’t right
@Houston & Judee: It’s just because you have to select the Foreground to Transparent (which is positioned in the 2nd place) gradient instead of normal Foreground to Background gradient. Hope it helps! 😉
One of the things that impress me about you and your tut’s is your ability to think up ideas that appeal to the many. I also of course like you teaching technique.
I too am a armature tutorial make for Photoshop and know how hard these things can be, I only hope to match your standard one day.
Thanks.
Narandra… I am grabbing the 2nd gradient, foreground to transparent… but the sample in the bar window when selected shows solid black.. and no matter where I place my gradient icon to draw the gradient from, it still comes up solid black.. that’s why I think my gradients are corrupted or it’s because it doesn’t work in cs2… I really don’t know, all I know is that I’m doing it exactly and selecting the correct options and it’s not working… sigh…but thanks for trying…
owh..nice one.i want to make it.but i don’t have much time to do it.wish i can. is sit easy??hope it is..by the way. where can i get adobe photoshop CS4 for free??well.. i have my CS3 here. 😀
When ever I try to use the Gradient at about 3:32(video time) something pops up saying
“Could not use the Gradient tool because the affected area is empty or does not overlap the canvas” Could someone help with this please 😀 Thanks!
This looks great and I want to do it too but, I am also having the same problem as Jake, I can’t seem to get past the gradient part either. Any tips would be great! Thank you!
Hi! Great tutorial, and fun!
I did it, and it looks cool. But I have a doubt. I’m from Argentina, and my English it’s decent but there’s something I didn’t get it: when you put the Clouds Filter, and hold it to obtain more contrast, which is the key you press?
Maybe someone could help me.
Thanks in advance! 🙂
I am having a problem around the 2:02 mark of your video. I am using Photoshop CS2. When I try to select the thin rectangle around the top of the image using the rectangular Marquee tool, photoshop is unable to do this because “No pixels are more than 50% selected.” Am I missing something. Any input would be appreciated.
Thanks! A helpful tutorial and it work’d perfectly! Thanks and btw that was my first photoshop and i got it rite even tho i have diff version than in the vid 🙂


hey nice.
and 1st comment
Great tutorial but what where I am loosing you is when you put the gradient above the cloud layer. You don’t seem to be using any transparency or blending mode but yet in your tutorial, it doesn’t cover up the underlying layer of the cloud layer. Why? It does when i try to follow along. I had to change the blend layer of the gradient layer to Multiply to get it to look like yours. What am I missing?
Thanks,
Houston
Thanks for the turorial 🙂 it looks so easy to make when you explain it.
Houston,
Make sure you are using a foreground (black) to transparent gradient. If you look closely, it does apply some darkness over the top of the cloud layer, and gradually becomes more transparent. Make sure you start the gradient below the bottom of the image and go straight up. If you begin the gradient above the bottom of the image, it will make it completely black, then gradually transparent.
simply awesome.
Tks for your teachings
Nice tutorial!
Thanks
I’m having the same problem as Houston.. and I read Gman’s response, and tried it, and I still get a completely black cover, no gradient…. I have the right gradient selected, but still no black to transparent shows up… can’t figure out what I’m doing wrong. Could my gradient file be corrupted, although I tried to create my own and still have the same problem. I’m working in CS2, could that be the problem.. any help would be appreciated, it’s very frustrating when I follow step by step and can’t get it to work.. In fact I’ve tried all the gradient that have transparency in them and none of them work.. maybe I have some setting that isn’t right
@Houston & Judee: It’s just because you have to select the Foreground to Transparent (which is positioned in the 2nd place) gradient instead of normal Foreground to Background gradient. Hope it helps! 😉
lol now i was stuck 😀 as there is no Twirl option in my cs3 🙁 i guess corey used cs4 for this this tutorial!
One of the things that impress me about you and your tut’s is your ability to think up ideas that appeal to the many. I also of course like you teaching technique.
I too am a armature tutorial make for Photoshop and know how hard these things can be, I only hope to match your standard one day.
Thanks.
PJ
good tutorial !
full screen button doesn’t work .
be even better tutorial if it did work.
Amazing !
Narandra… I am grabbing the 2nd gradient, foreground to transparent… but the sample in the bar window when selected shows solid black.. and no matter where I place my gradient icon to draw the gradient from, it still comes up solid black.. that’s why I think my gradients are corrupted or it’s because it doesn’t work in cs2… I really don’t know, all I know is that I’m doing it exactly and selecting the correct options and it’s not working… sigh…but thanks for trying…
owh..nice one.i want to make it.but i don’t have much time to do it.wish i can. is sit easy??hope it is..by the way. where can i get adobe photoshop CS4 for free??well.. i have my CS3 here. 😀
😀
great tutorial, another one i can most def show off to my friends……………………..thanks again Corey your the best.
Great job!!! I think I messed up on mine though 😀
When ever I try to use the Gradient at about 3:32(video time) something pops up saying
“Could not use the Gradient tool because the affected area is empty or does not overlap the canvas” Could someone help with this please 😀 Thanks!
This looks great and I want to do it too but, I am also having the same problem as Jake, I can’t seem to get past the gradient part either. Any tips would be great! Thank you!
-Beth
your stuff rocks man i appreciate it alot
Hi! Great tutorial, and fun!
I did it, and it looks cool. But I have a doubt. I’m from Argentina, and my English it’s decent but there’s something I didn’t get it: when you put the Clouds Filter, and hold it to obtain more contrast, which is the key you press?
Maybe someone could help me.
Thanks in advance! 🙂
great solution for the transparasy would be to lower the opacity and keeping the transparasy selected helpt for me
Thanks for the tutorial,
I am having a problem around the 2:02 mark of your video. I am using Photoshop CS2. When I try to select the thin rectangle around the top of the image using the rectangular Marquee tool, photoshop is unable to do this because “No pixels are more than 50% selected.” Am I missing something. Any input would be appreciated.
-Mike
Great tutorial.. even a duffer like me was able to do it pretty quickly 🙂
hey.
thanks a lot for the tutorial!
thumbs up from Norway
Hey what a great tutorial. Was very easy and the end result was awesome! Thanks 🙂
Very Good, creative.
I get stuck at the Filter->Distort->Polar Coordinates part.
When I go to Filter->Distort, the only option I have that’s active to select is Lens Correction. Any ideas?
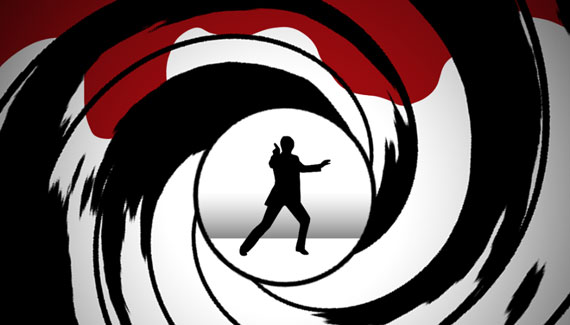
Great tutorial but where did you get the graphic of the spy from?
really cool stuff there
Thanks! A helpful tutorial and it work’d perfectly! Thanks and btw that was my first photoshop and i got it rite even tho i have diff version than in the vid 🙂
Really decent post… I love it. Keep ’em coming… 🙂
awesome!! So simply explained and to do!
i really love this its amazing i wold do it all night
hello guys
I just want to say hi
hello guys
I just want to say hi
Another great tutorial. Thankfully my final imagine looks like the end product…
Great, easy to follow tutorial. Not an expert but was done within timeframe of the video.
Here’s mine 🙂 http://www.flickr.com/photos/minx_phillips/5180935845/
Tlumacz jezyka rosyjskiego zaprasza na lekcje
Russian language translator offers lessons
??????? ?????????? ????? ?????????? ?????
Ruský jazyk pøekladatel nabÃzà lekce
Russisk spra*k oversetter tilbyr undervisning
Russische vertaler biedt lessen
Russisch Ãœbersetzer bietet Unterricht
As a James Bond fa, I couldn’t miss this tutorial hahau