

Page layout programs, such as InDesign, and illustration programs, like Illustrator, can easily handle “bleeds” and can automatically place crop marks. In Photoshop, you can use Print with Preview’s crop marks and bleed options, or you can create the crop marks manually. Crop marks indicate where a page will be cut (or trimmed) after printing. When artwork is supposed to extend all the way to the edge of the printed page after cropping, it’s common to use a “bleed.” By extending the ink past the crop mark, you ensure that minor errors in registration or trimming don’t produce an unsightly white line along the edge of the artwork. Consider, if you will, the difference between these two advertising cards. The lower example has an error in either registration or trim, leaving a white area along the right edge.

Creating a bleed requires some advance planning. To produce the 4-inch by 6-inch advertising cards shown above requires a canvas slightly larger than 4-x-6 to accommodate the bleed area. Your print shop can tell you the bleed size required. Photoshop’s Print with Preview permits bleeds to 0.125″ but you can produce larger bleeds manually. For a 0.125″ bleed all around the artwork, you’ll need to work with a canvas size one-quarter inch wider and taller that the artwork itself. In this case, the 4-x-6 cards will be produced on a 4.25-x-6.25 canvas. Use Guides to indicate the actual artwork area while working.

TIP: Photoshop’s menu command View> New Guide enables you to place guides numerically, ensuring precision.
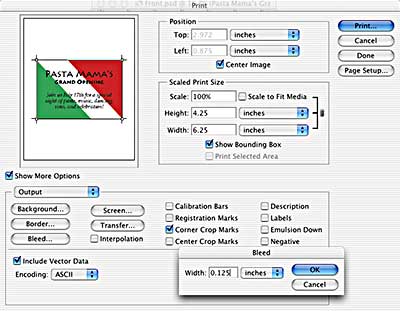
When ready to output, use Photoshop’s File> Print with Preview command. In the Print with Preview dialog box, check the box “Show More Options.” In the Output area, check the “Corner Crop Marks” box, then click the Bleed button. You can specify a bleed from 0.0 to 0.125 inches. When the page is printed, the crop marks will be moved inward the specified distance.
But what if your printer requires a bleed larger than 0.125″? You can create the crop marks manually. Zoom way in, make a rectangular selection based on the guides, then use the menu command Edit> Stroke. (In this example, the Pencil tool was used with a one-pixel brush and the Centered option was selected in the Stroke dialog box.) The innermost horizontal and vertical lines can be used as the crop marks.

how to crop and bleed but the bleed should be as part of the picture and than save as tiff?? and not with priview put save to submit to print.
Thanks for sharing. It’s a good technique when you’re in hurry at PS, usually Illustrator has this option which is very useful for the one who’ll print..
Thanks for help on explaining the function of bleed.