
5 Second Eye Enhancement
Here’s a super-simple technique for enhancing the most important bits of any portrait: the eyes. It’s a quick and painless way to make the eyes really stand out and take on a slightly sultry and burning look. To illustrate, we’ll use a photo of a beautiful woman culled from the vast database over at iStockphoto.com.
Arrange your workspace
Step 1: Pop open the photo and immediately duplicate the background layer by pressing Command + J (PC: Ctrl + J). You don’t have to do this, but it’s a good idea to protect thyself from, well, thyself and it’ll also give you a way to back off of the effect in case you overdo it.
NOTE: You could also select just the iris area with the Lasso tool and jump that up onto its own layer. If you have other retouching to do, that might be the best choice.

Step 2: Choose Window > Arrange > New window for [document name]. Zoom into the new window so you can see what you’re doing by pressing Command + (PC: Ctrl + ), and keep the original window at roughly the size the image will print at. This will allow you to see how much of an effect the enhancement is having. Anything you do in one window is automatically reflected in the other. It’s a handy way to work when you’re retouching.

This is what my workspace looks like now:

Enhance the iris
Step 3: Grab the Dodge tool (circled in red below), and immediately cast your eyes upon the options bar at the top of your screen. Lower the Exposure to about 30%. Mouse over to the photograph and size the brush cursor so that it fits only the iris area (be careful not to brush over the dark outer edge of the iris).

TIP: Press the left bracket key, [, to cycle up in brush size, and the right bracket key, ], to cycle down.
That’s really all there is to it. Because we lowered the Exposure, we can “build” the effect to the intensity we like by continuing to dodge the iris. If we go a little too far, we can decrease the opacity of the duplicated layer to lessen the effect, like so:

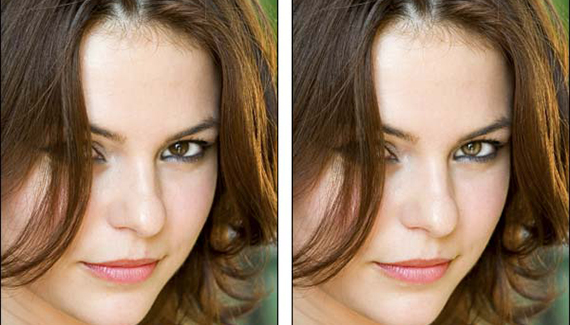
Here’s our before and after:

A simple, yet effective technique. That’s the way I like ’em! Until next time, may the Photoshop force be with you all.

Excellent trick. Thanks!
very nice
thats ace thankyou
Thank you for your tremendous tips. I love this site! Poor grad student who wants to learn more without spending an arm and a leg.
Thanks Dude,
It really works !!!
This is so simple and works so well, not just on eyes but teeth too!
Thank you.
can u gave me some tip of your make up things
nice effects
Nice effects.
good tutorial
WoW 🙂 Awesome tutorial. Very easy, short and well explained tutorial. Thanks for sharing this nice post.
where can i get this file at, as in were can i download it?
So simple, but so useful. Thanks for this tut.