
Photoshop’s Replace Color adjustment is a quick and efficient way to swap one color for another.
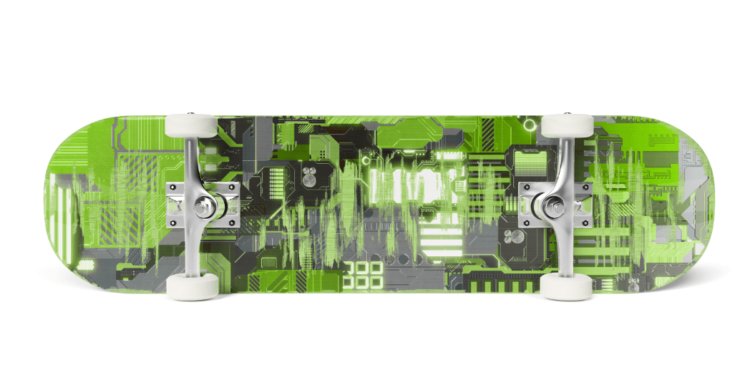
In this step-by-step tutorial, I’ll show you how to quickly change the red design of the skateboard and turn it into a vivid lime green design.

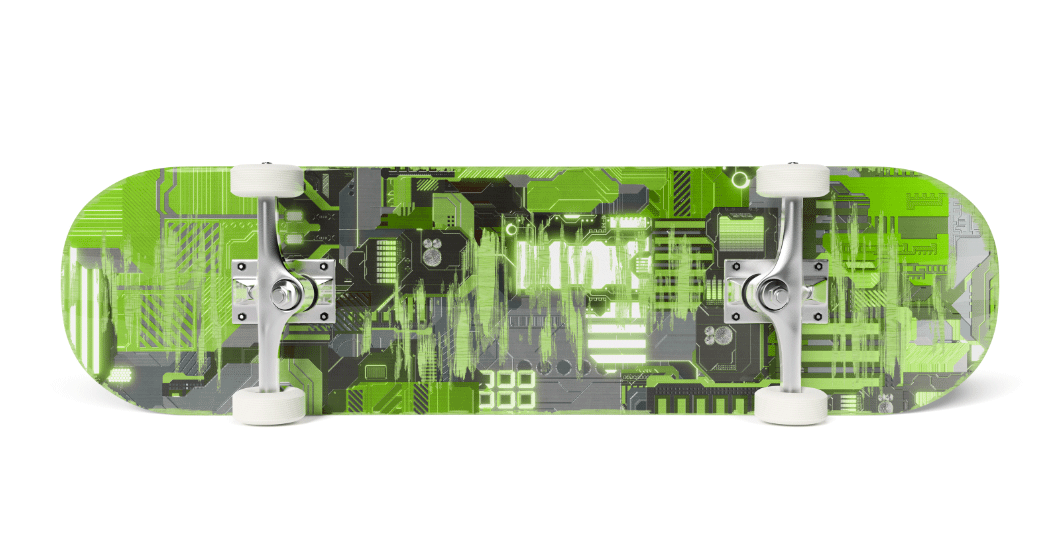
Step 1
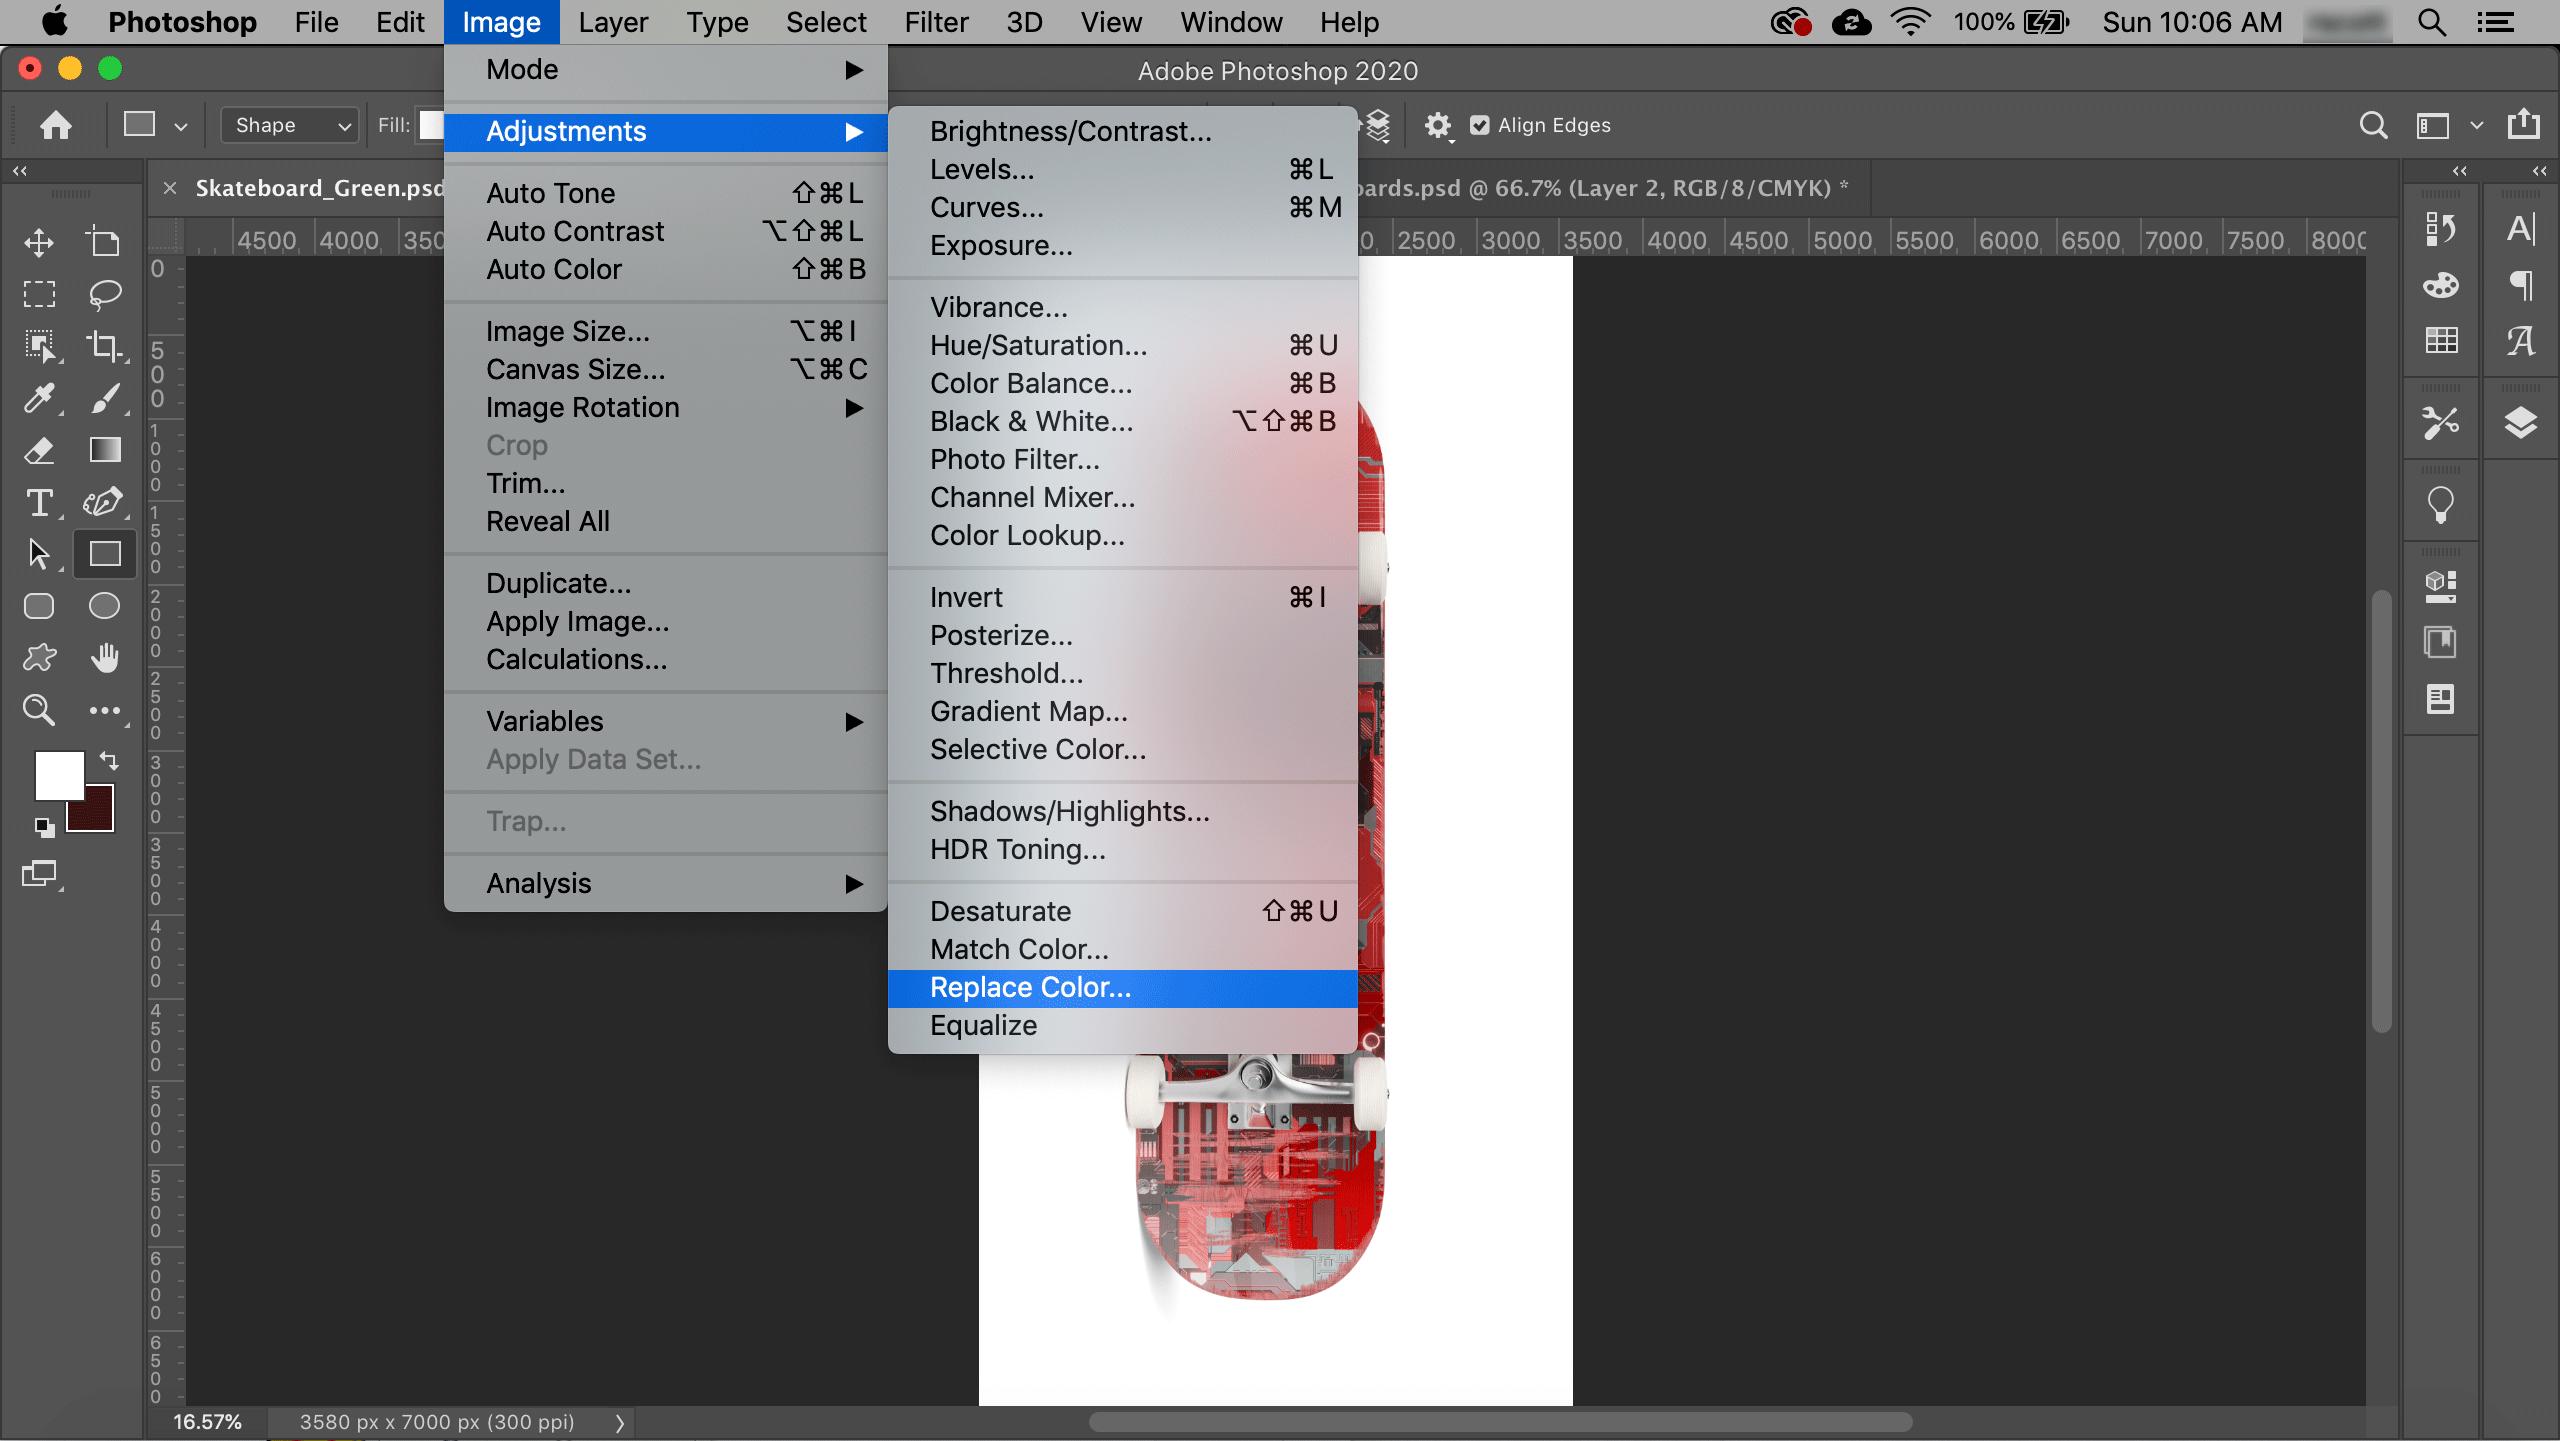
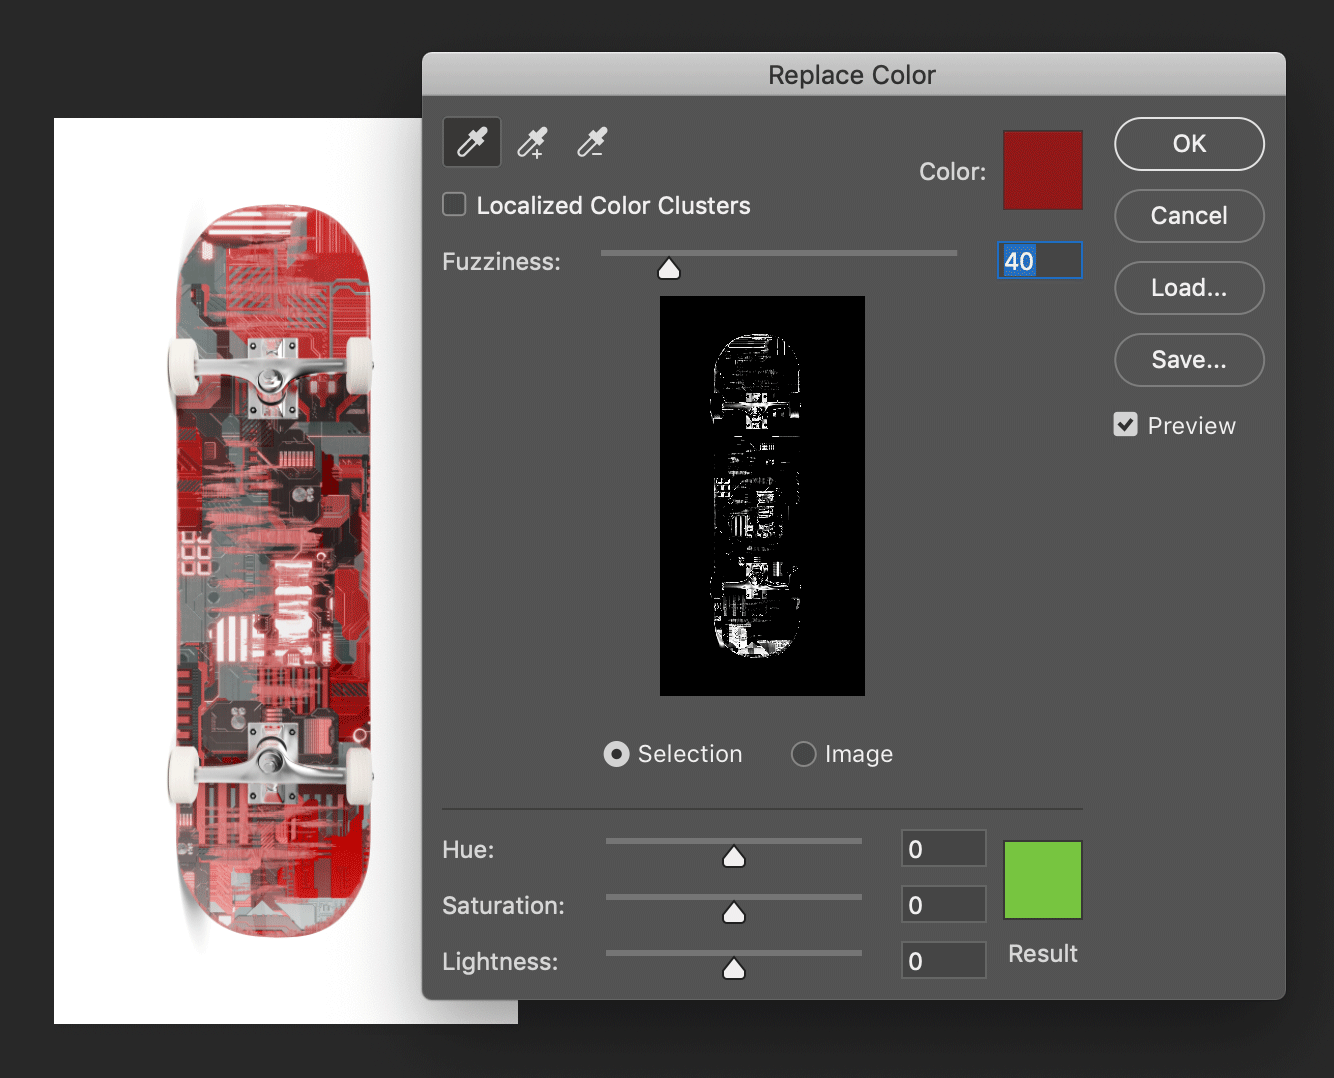
Start by going to Image > Adjustments > Replace Color. Tap in the image to select the color to replace — I always begin with the purest part of the color. Fuzziness sets the tolerance of the Replace Color mask. Set the hue you’re changing to with the Hue, Saturation, and Lightness sliders.
Step 2
Next, choose the eyedropper with the plus sign to add to the selection. Tap on any remaining red areas to change them to green. (If you accidentally click in a spot you don’t want to change, hit command/control-Z to undo.)

Step 3
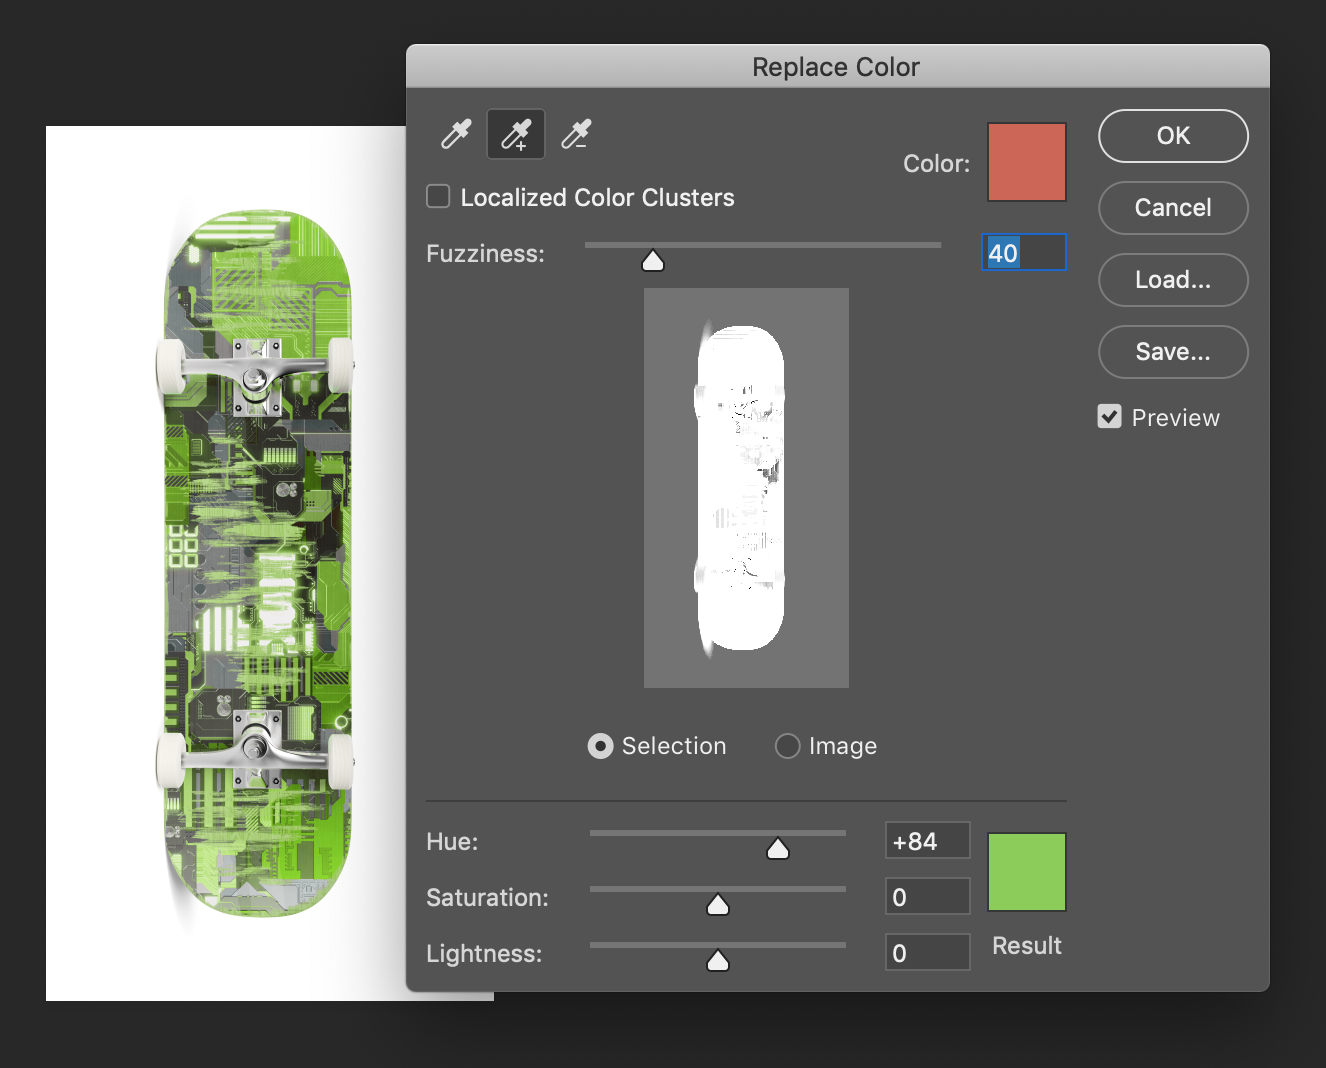
When you’re finished selecting all the red that needs to be changed, hit the OK button. Save under a different name (green_skateboard.psd) to keep both the red original skateboard and the replaced color boards.
Want to learn more quick photoshop tricks like this one? Head on over to KelbyOne where you can find classes on anything from blending to mastering selections to advanced compositing and more.
Here are a few of my personal favorite online photoshop classes:
20 Super Quick Photoshop Tricks You Can Try Right Now with Unmesh Dinda
Mastering Selections in Photoshop with Glyn Dewis
Creative Color Grading in Photoshop with Gilmar Smith

thank you so much for this.
Thanks
I can’t get this to work with black.
How can you change black to another color?
Thanks!!! Never used this tool before. Always tried to correct manually. This was quick and to the point and worked perfectly! Great job!
Simple tutorial. One thing is missing – where exactly to find the tool in photoshop for the beginners. Image > Adjustments > Replace color.
lol………my applogies, only NOW read tutorial in entirety.
It’s okay dude, we all make mistakes. I like the tutorial.
Excellent tutorial – I have struggled with this for ages and always ebded up with a big mess. It really is simple when you know how!
In my experience the color replaced will allow you to change from blue to a slightly darker blue or perhaps a greenish hue, but never a full range of colors let alone all the way to yellow.
Everything is changing except what I want to change…My sky is slightly blown out and I want to put blue back into it..its not working. e
Everything else is changing.
help!
Also had trouble with black, then realized you don’t have to use the sliders. Just click on the color box at the bottom and pick any replacement color you want.
I also can not get this to work at all with black even when I click in the bottom color box. It seems like it will only do a gray scale.
But Jeff, even with your tips,.. I u try to replace black with blue for example, it wont let you.
It Only allows a few limited shades, mostly greys, hmm.
Nice short, but fast tutorial on the replace color tool. Thanks for putting this online for the rest of us. I am a website designer over at WebYabber.com and this is something that is very handy when you are working on graphics for websites.
Thanks for this. I am also having trouble with black. It turns out there is much more white in the image than I first noticed and trying to change a black background to white resulted in no definition for a lot of the picture, totally washed out the image
Very useful tutorial. However, I agree with Rush – trying to replace black with blue is a problem. The tool falls short here.
tanzanite
This is nicely explained! I have one problem-my image is RGB but the replacement color, no matter how vibrant, looks like it’s applying in a greyscale format. Does this only work in CMYK? Are my settings wrong? Any help would be great…
like the others, can not get it to work with black
I’m trying to replace a white area in a picture with black so the screen blending effect will work everywhere I want it too.
No matter how you change white it’s still white…
Any help would be appreciated… I’m sick of pixel by pixel changing the color white to black… Its taken me hours and I’m not even 1/4 done.
Nevermind.. Problem solved xD
Will no one answer the question about changing black to another color?
I also have this problem. No matter what colour you choose as the result, it still ends up being different shades of grey/white/black
The way to change the black to another color is to click on the result color at the bottom and then change the color in the tool panel box that pops up. I hope this helps.
In order to replace black colored areas with a color not on the gray scale, you must do this—–>
Image-> adjustments->selective color
here you are able to adjust the CMYB levels(Cyan, Magenta, Yellow, Black)
I found this to be my solution at least, however, it seemed my problem was too easy to solve so.. idk
RAOK(Random act of kindness) (. . )
(_)
THis works fine for photo, but when I bring in a black and white object or a black object with no background, I don’t get the ful Replacement window. I only get a slider for lightness, which appears to do nothing.
How do I change a solid black logo to another color?
THanks,
Michael
Michael,
Don’t know if this is the best way but it works for me. Use the sliders to set your foreground color. Use the paint bucket tool, on the side tool bar, to click on the black image you want to change. The black should change to your new foreground color.
Let me know if this works for you.
Julie
Another great tool for changing black to other colors is to set your foreground color to what you want, then go to Image > Adjustments > Gradient Map.
This is especially helpful if you have a B&W image and want to see it in another color.
Thanks Amy Lear, you are the ONE person who’s answered this helpfully.
Julie W, wtf is “Paint Bucket Tool”?? Are you sure you’re not using MS Paint??
The black problem – I think the replace color tool has a problem working in 16 bit mode. Try 8 bit mode – it sort of worked for me
@bemused…
The “Paint Bucket Tool” is paired up with the “Gradient Tool” in your toolbar. You probably see the gradient tool, just whole your mouse button down on that image and it will expand giving you the option to use the paint bucket. Another way is to hold the Shift down and press “G” (at least in Windows).
Excellent tutorial!!! Thank you so much for this. Very useful…
For the greyscale / black replace issue.
Solution:
1. Make a selection for the area you wish to replace the color – select, color range
2. Layer -> Layer Style -> Color overlay
done
Adrian’s layer style > color overlay worked perfectly for me. Quick and easy.
Thank you about changing the foreground…Ive been trying to do this for almost an hour
Amy Lear, you are a lifesaver! Thank you 🙂
Thank you so much. Super easy…I thought simply replacing the main image color was going to be far more complicated! Cheers.
Wow, Amy Lear saves the day! I have been googling and studying this problem for TWO HOURS despite having many other urgent tasks to do.
All I wanted to do was change a black lineart scan I had made into a color.
Amy’s solution is the ONLY ONE THAT WORKS and THIS IS THE ONLY PLACE THAT MENTIONS IT! How can we, the public, get this solution more prominence? I think it is very common that people want to change the black of scans of black lineart into various colors.
Wow, thanks again! Saved my day. I had zero other leads.
I’m helping my kids launch a Cafepress shop for their sketches — to put them onto t-shirts and such. I wanted to make the art into various colors. Now I can! …And now I can get back to real work!!! (And, heck, I’ve used Photoshop since it was invented! I get behind a few years because I keep using the same good ol’ versions that I get familiar with. When I finally update I’m LOST LOST!
Thanks! There are so many ways to accomplish a task in PS… it’s baffling to someone who’s not a frequent user. And the Adobe site assumes too much prior knowledge.
You hit my problem right on the head.
THANKS, THIS TUTORIAL WAS A GREAT HELP FOR ME. I’VE ALWAYS WONDERED HOW DO YOU CHANGE THE COLOR OF AN LOGO AND ETC WITHOUT HAVING TO START FROM SCRATCH.
I was having the same trouble figuring out how to do this with black – the Replace Color tool just doesn’t work. In the end I tried just using the old fashioned paint bucket tool, and it worked perfectly.
ok foto pq
HUGE time saver. THANKS!!
I have a picture with a girl wearing a white shirt taken on a white background. I want to move her to another picture but i can’t see all her shirt to make a seletion, what do i do for this?
Jim
Thanks to Amy Lear for finally answering the question.
Okay, this thread hasn’t been commented on for a while but, whatever.
For those of you trying to change a COLOR to BLACK one way thats worked for me is to select the area you want to change and then go to Image>Adjustments>Black & White and then adjust the sliders as you please. For example, if there was an area of blue you wanted to be black you would have to move either the Cyan or the Blue slider (depending on the hue of what you want to change – I would try to use both if it were possible, just to be safe) and bring the marker into the blackest part of the slider. Of course, this could result in unwanted areas being adjusted if not slected correctly.
As far as changing BLACK to a COLOR, I still can’f figure that one out either, sorry. Nothing probably works because photoshop doesn’t recognize black or white as a color.
Anyway, hope this was helpful. 🙂 GOOD LUCK!
I found something that worked great for me that will work for black (that’s what I used it on), select all the shade of black that you picked, you won’t have to keep shit-clicking to add to the selection, it will include the open spaces between lettering, not mess up gradients, and not change the color of the whole image. Here it is:
Go to Select->Color Range and if it doesn’t already pick up the color you want to select, click on the color and hit ok.
You will see all of the selection (which includes small lines, everything that color)
Go to Layer->New Fill Layer->Solid Color and select the color that you want.
Technically this covers up the old color but it gets the job done, even on black; in fact, I haven’t tried it on any other color.
Hope you enjoy!
In the change color, following the instructions after many tries, I could not do it. I got to the change colorwindow okay, I click it onto select, then I used the right hand eyedropper to pick up the color I wanted to change to, then the plus eyedropper for color I wanted to change, clicked okay and nothing. I reversed the the process with colors, hit okay, nothing. I was not able to get the top color box different from the bottom color bax. Once I hit the +eyedropper and click on the color, both boxes changed. Spent three hours trying to get this thing to work. Oh, BTW, the color is a white background for a clip art, Will that make a difference? Please help. Peter
I am using this tutorial now. I feel that is easy tutorial and that is helping me much.
THANK YOU for making this simple!!!!!!!!
I SEE A LOT OF US HAVING THAT SAME PROBLEM WITH CHANGING THE COLOR FROM BLACK TO ANOTHER COLOR. I DID IT SEVERAL TIMES N I KEEP GETTING THE SAME RESULT. WHAT AM I DOING WRONG. HELP ME SOMEBODY. LOL
Nice tutorial keep it up
Thanks a lot lol
It makes the vivid yellow I wanted into a dark mustard colour 🙁
Thank you! Saved me lots of time. Although I wish it did replace with exact color without additional configs.
Missing: Where does the GREEN result come from??
I need to replace a color with a specific color. I am doing a design where the client has a specific shade (CMYK settings) and I need to make the logo accompany the title in the exact same color.